![]()
![]()
|
|
|
See Also |
Next |
Manage Workgroups is an administration utility that associates employee properties (such as queues, office location, supervisor, and resource configuration) to a workgroup.
New employees that are assigned to that workgroup can automatically inherit all of the proper attributes. This speeds up and simplifies the process of adding new employees, since most of the attributes for an employee will be defined by the type of job they are destined to be performing.
When an employee changes work assignments, the attributes of the new workgroup can override the current settings for the employee automatically just by changing the workgroup.
The top part of the Manage Workgroups page allows selection of an existing Workgroup, or a new Workgroup to be added. The Select Workgroup dropdown list shows the current Workgroups. To view/edit a Workgroup, just select it from the list.
To add a new Workgroup, click the Add Workgroup link. A prompt will appear for the name of the new Workgroup. Once it is added, it will be included in the list of Workgroups. Select the new Workgroup to continue adding its details.
The tabs on the Manage Workgroups page allow the properties, queues, and members to be maintained for a Workgroup.

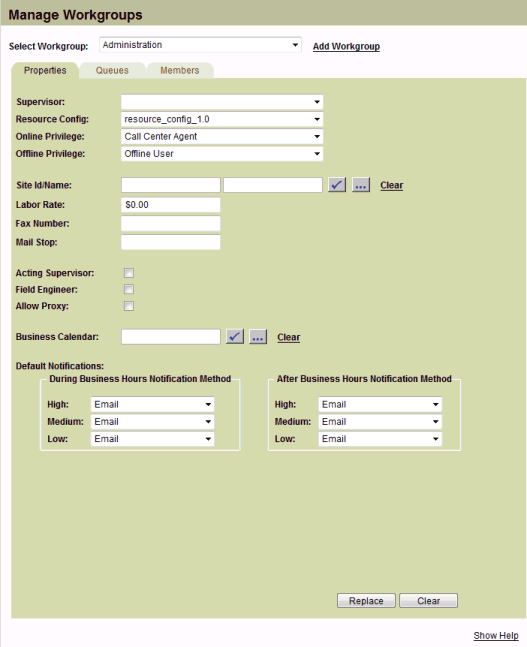
The properties for a Workgroup are easily managed from the first tab:
The Supervisor for a Workgroup can be selected from the dropdown list of eligible employees.
The Resource Config selection sets the default resource configuration that new employees will be initially added to. The dropdown list box will show the list of available resource configurations.
The Online Privilege and Online Privilege select boxes will set the default privilege classes for new employees. The dropdown list boxes will show the list of available privilege classes.
The Site ID/Name fields indicate which site that Workgroup members will be located at by default. The Select Site page can be opened; just click the checkmark icon to the right of the Site Name text box. For a site that is already shown, the info icon is used to see the site details. Click the Clear link to remove a Site.
The Labor Rate field sets the default value for new Workgroup members.
The Fax Number field is used to assign a default fax number for new Workgroup members.
The Mail Stop field will indicate the default mail stop for the workgroup's new members.
If the Acting Supervisor, Field Engineer, and Allow Proxy checkboxes are checked, then the corresponding properties for new Workgroup members will also be checked.
The Business Calendar can be selected and viewed for the Workgroup. This calendar will then be used for new Workgroup members. To select a Business Calendar, just click the checkmark icon to show the Select Business Calendar dialog and make the selection using that form. The info icon can be used to see the calendar details. Click the Clear link to remove a Calendar.
The Default Notifications section is used to configure the default selections for Notification of the Workgroup members.
The During Business Hours or After Business Hours areas both have a High, Medium, and Low list boxes to indicate the preferred methods of communication in the event that a notification needs to be made, corresponding to the respective time frame. Select the proper communication method for each of the six choices.
Once the necessary changes have been made, click the Replace button to update the Workgroup record in the database.
The Clear button will reset the Workgroup page.
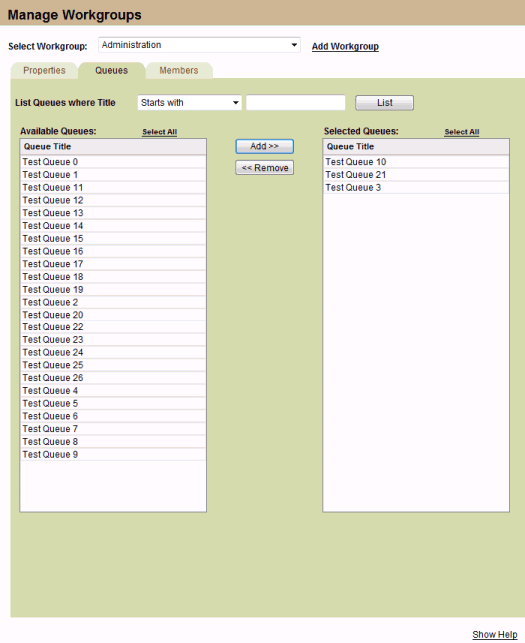
The Queues for a Workgroup are managed from the Queues tab:
The filter at the top of the page can narrow the list of available queues. Clicking the List button will fill the Available Queues list on the left with queues that match the filter.
In the Available Queues area, select the queues for a workgroup by clicking on the row of each queue to be added. Click the Add >> button to move the selected queues to the Selected Queues list on the right.
To remove a queue from the Selected Queues just click on the row to highlight it, then Click the << Remove button.
To save the changes, click on the Properties tab and then click the Replace button.
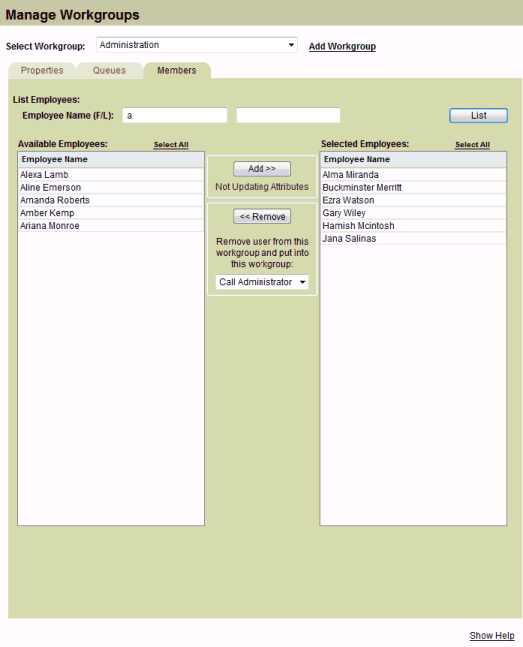
The Members of a Workgroup are managed from the Members tab:
The filter at the top of the page can narrow the list of available employees. Clicking the List button will fill the Available Employees list on the left with employees that match the filter.
In the Available Employees area, select the employees to be in the workgroup by clicking on the row of each employee to be added. Click the Add >> button to move the selected employees to the Selected Employees list on the right.
To remove an employee from the Selected Employees just click on the row to highlight it, then Click the << Remove button.
There is a Configuration Item that is used on this tab for the Workgroup.
If the Workgroup_Propagate is set up, it should be set to "ask", "always", or "never".
If it is "ask", a checkbox will be displayed under the Add >> button, and be labeled Update Attributes. When this checkbox is visible and checked, the employee properties will get updated when they are added to this Workgroup.
If the configuration item is set to "always", the checkbox will not appear. There will be a Updating Attributes label under the Add >> button, and the employee properties will always get updated when they are added to this Workgroup.
If the configuration item is set to "never", the checkbox will not appear. There will be a Not Updating Attributes label under the Add >> button, and the employee properties will not get updated when they are added to this Workgroup. (This is the situation shown above.)
To save the changes, click on the Properties tab and then click the Replace button.
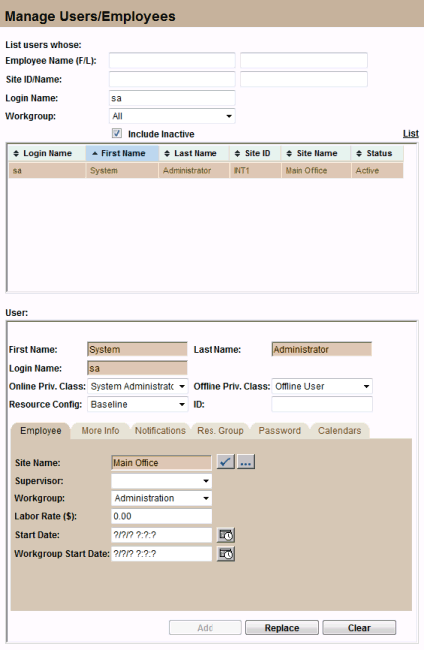
The Users/Employees page is used to modify the users in the database. A Workgroup dropdown list is used to add/remove an employee from a workgroup.
There is a Configuration Item that is used on the Users/Employee page for Workgroup.
If the Workgroup_Propagate is set up, it should be set to "ask", "always", or "never". If it is "ask", a checkbox will be displayed to the right of the Workgroup dropdown list. When this checkbox is checked, the employee properties will get updated when a new Workgroup is selected from the Workgroup dropdown list.
If the configuration item is set to "always", the checkbox will not appear, and the User/Employee properties for the Workgroup will get updated from this page.
If the configuration item is set to "never", the checkbox will not appear, and the User/Employee properties for the Workgroup will not get updated from this page.