
Introduction
Dovetail Seeker searches your Dovetail CRM data including rich content from CRM attachments and file system documents using a powerful and familiar Google-like search interface. Using the power of Lucene, an open source high performance search library, Dovetail Seeker lets you quickly index exactly the data you want within your Dovetail CRM environment.
This document will help you understand:
- How Dovetail Seeker works together with Dovetail Agent and Dovetail SelfService.
- How to install Dovetail Seeker.
- How to configure what information gets indexed and thus what information becomes searchable.
- How to keep your search indexes up-to-date.
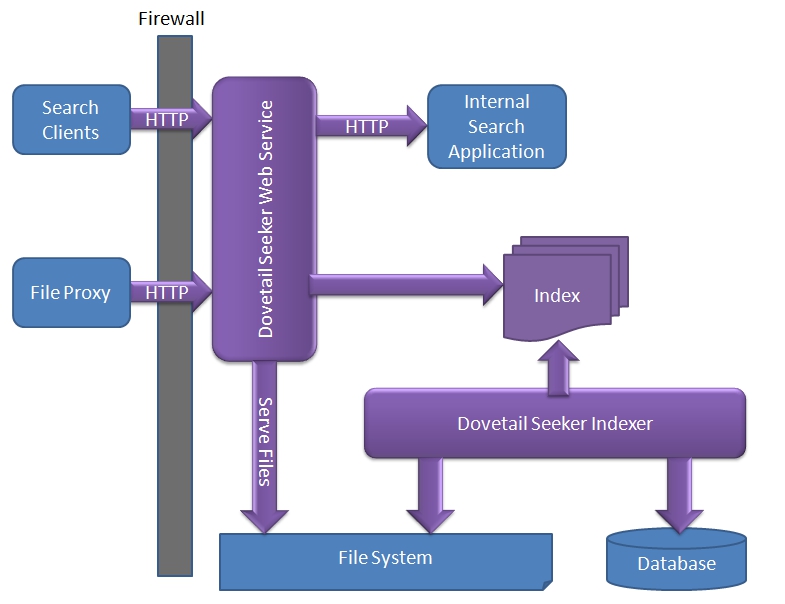
Architecture
Dovetail Seeker contains two major components: indexing and searching.
Indexing
Before you can search for your data, you need to index it.
What is an index?
An index is a collection of searchable data organized into documents each having many fields of information. Every document in the index is a potential search result with each document's field potentially containing one or more searchable terms. Documents created by Dovetail Seeker are of the following types:
- An entity your Dovetail CRM system whose contents populate the document's fields. It is possible to configure the exact database tables and fields used to populate this document.
- A file attachment related to a Dovetail CRM entity .
- A file
You may use either the Seeker Indexing Windows Service or Seeker Console to create and update your search index with data from your Dovetail CRM system or from files your organization commonly uses.
For example, you will likely wish to search for cases in Dovetail CRM. For each case in the system, the indexing application will add a dovetail document to the index containing details about that case. The document will contain at least an id, title, and case summary. Once a document for that case is present in the index it can be searched – the case id, title, and summary are available as search results.
Files can also be indexed. When the indexer encounters a CRM attachment or is told to index a directory a file document is added to the index with the text extracted from the file used as the summary searchable contents.
Testing
Seeker Console also provides a basic search interface to facilitate testing index contents.
Searching
Once your CRM and file content is indexed you need to expose your search index to the world. The Seeker web service is the workhorse here providing a search API for search clients written in whatever language you like to have access to your indexed content.
Seeker web service
Seeker is a web application that allows you to search an index created with one of the indexing applications. Seeker runs as a stand alone web application that provides search capabilities to Dovetail CRM applications.
Search queries are submitted to the Seeker web service using a standard HTTP GET request. Search results are returned as JSON, a standard data format that can be consumed by cross platform applications.
Because Dovetail Seeker is exposed as its own web application, the search operations can be used for both Dovetail Agent and Dovetail SelfService.
Seeker File Proxy
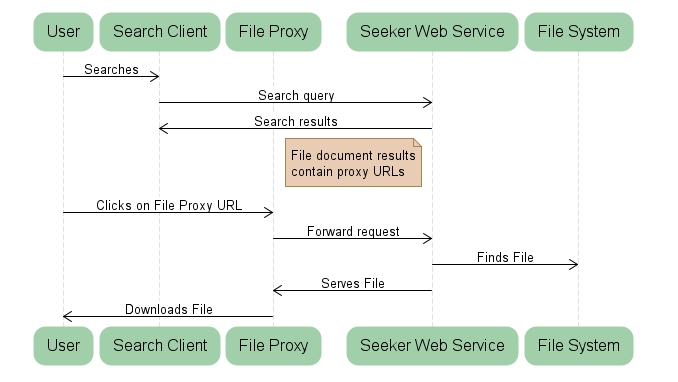
Dovetail Seeker gives you access to your indexed CRM attachments and file system documents. It is recommended that you use the included file proxy to securely expose your file documents to public facing search clients.
Search results returned for files contain a download URL which can be given to the search user allowing them to download indexed files. The Seeker web service is responsible for fulfilling these download requests but usually is hosted behind a firewall.
To give public search users the ability to download indexed files we've included a proxying web application which the Seeker web service can be configured to use.
Integration with Dovetail applications
Our Dovetail Agent and Dovetail SelfService web applications are able to use Dovetail Seeker's search capabilities. Each application has its own search interface allowing users to search Dovetail CRM.
Here is an example of how Dovetail Agent executes a user's search:
- A user enters a search query into the search interface of Dovetail Agent.
- Dovetail Agent makes a GET request to the Seeker web service.
GET http://<server>/search/search?query=Error - Seeker returns search results to Dovetail Agent encoded as JSON.
{"SearchResults": [{"Score":1, "Domain":"case", "Id":"7", "Title":"Case with error in the title", "Summary":"Case History"}], "TotalNumberOfResults":1, "StartResultIndex":0, "SearchQuery":"Error"}- Dovetail Agent converts the JSON to a JavaScript object used to display search results to the user.
How it Works
Dovetail Agent and Dovetail SelfService use the Seeker web service to perform searches. Dovetail Seeker includes two indexing applications: Seeker Console, a command line application, and Seeker Service, a windows application, which are responsible for keeping the index up-to-date.
An index is a collection of files in a directory. Indexing applications create an index using Document Specifications as a guide to know what details about Dovetail CRM entities, attachments, and what files to index. The indexing applications must have read-only access to the Dovetail CRM database and write access to the index directory.
Seeker Web Service
The Seeker web service exposes search capabilities to any HTTP capable application. The web service executes searches against the index and returns the results in JSON format.
The web service is also responsible for serving indexed attachments and file documents and will need read access to the directories where these files are stored. A file proxy web application is used to service indexed files to public facing installations search users.
The web service must have read access to the index directory and any attachments and file system directories it is indexing. We recommend that the index directory is be hosted on a file system local to the Seeker web service.
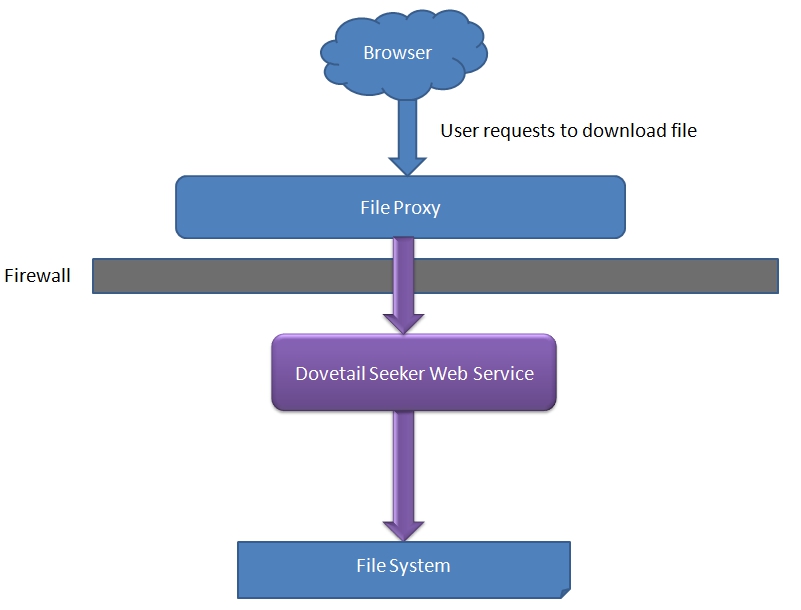
File Proxy
Dovetail Seeker is able to index Dovetail CRM attachments and files using file document specifications. Search results for file documents contain a URL which users can use to download the indexed file.
The included Seeker File Proxy is necessary because it is not recommended to expose the seeker web service directly to public facing networks. The Seeker File Proxy web application can be installed outside your firewall to specifically handle public search user's requests to download files.
A file request is shown below in a sequence diagram with the different component interactions.
File proxy components
The file proxy web application uses Microsoft's Application Request Routing to proxy file uploads and downloads between the public Internet to the seeker web service. The web.config file is setup to forward the file requests by installer. If you need to you can manually configure the file proxy.
Seeker web service
To serve files the Dovetail Seeker web service must have the same read access indexed files as the Dovetail Seeker Indexing Windows Service.
The Dovetail Seeker web service must be configured with the file proxy URL to serve files to public users. In the configuration file seeker.config, the value for seekerWebService.fileDocumentProxyBaseUrl entry must point to where the file proxy is installed.
The default location of the configuration file is [Install Path]\config\seeker.config.
If the value is empty, attachments and files are not accessible via HTTP to the search clients.The diagram below is a high level picture of the installed components that interact with file requests.
Administrative Page
Dovetail Seeker has an Administrative page that shows details about each document specification present in the index. This specification details view includes:
- The fields that make up the specification.
- The number of documents present.
- A sample search result for the specification.
- Link to re-index the specification.
You can view the Seeker Administrative page in two ways:
- Visit the home page of your Seeker web service application, usually -
http://<hostname>/seeker/. - Click the shortcut created in your 'Start' menu by the installer: Start > Dovetail Software > Dovetail Seeker
Security
No authentication is required for searches using the Seeker web service. If you consider your indexed information to be sensitive, we recommend you take appropriate measures to secure access to the index directory and the Seeker web service, such as:
- Limit access to the physical index directory.
- The Seeker web service only needs read access to the index.
- The user running the Seeker Console or Seeker Service applications needs write access to the index.
- If your Dovetail CRM web applications are exposed to the Internet, place the Seeker web service behind a firewall.
- Use Windows Authentication to limit Seeker access to only those applications requiring search capabilities.
- Disable anonymous access to the Seeker web service.
- Using Windows integrated security, limit the credentials with access to the Seeker web service.
- Rights to the Seeker web service should be granted to the credentials running Dovetail CRM web applications.
Getting Help
If you need additional help beyond this user guide, you can use any of the following resources:
- Dovetail SelfService - Use our online customer support site to notify us of a support issue, to manage your Dovetail products, to seek sales support, or to search the knowledge base.
- Knowledge Base Articles - Search our online knowledge base for existing issue resolutions.
- Product Documentation - Find Dovetail's most up-to-date product documentation.
- Blog Posts - Dovetail developers often publish useful posts about Dovetail Seeker
- Contact Us - Contact us directly if you need further assistance.
- support@dovetailsoftware.com
- phone 800-684-2055 or 512-610-5400
What's New - Version 2.7.2
Enhancements
- New connection string parameters:
Integrated Security=SSPI; and Persist Security Info=True;can be used to log into the database using current Windows login credentials.
Important: BeforeIntegrated Securitycan be used a server set up procedure must be followed, see Integrated Security with Dovetail server applications for details. - New
seekerIndexer.ApplicationUsernamesetting is available to specify a valid Clarify username used by the application.
Additional Changes
- Seeker documentation is now included in the installation folder tree.
Bug Fixes
- None
Requirement Change
Requires Microsoft .NET version 4.7.x.
Upgrading from a previous version
- Un-install your existing version of Seeker
- Install the new version of Seeker
What's New in Previous Versions
Previous Versions
Version 2.7.1
Enhancements
- None.
Bug Fixes
- Fixed a problem with file names containing "%" character followed by two hex digits. As a result, when such a file is being downloaded, the filename may be lost and replaced by "download" text by Chrome and Edge. Firefox is not affected.
Version 2.7.0
Enhancements
- Added support for Oracle database version 19c.
Version 2.6.2
Enhancements
- None
Bug Fixes
- Uploading an attachment using the Attachment Upload API could occasionally fail. Log file error: (15056) Session {GUID} was not found
Version 2.6.0
Enhancements
- The Attachment Upload API now supports an optional Username parameter.
- Cleanup of config settings to prevent conflicts, and to correct the casing of the setting key itself.
- Remove
searchAnalysis.stopWordsconfig setting fromSeekerConsole.exe.configand fromSeekerService.exe.config - Remove
searchAnalysis.stemmerconfig setting fromSeekerConsole.exe.configand fromSeekerService.exe.config - Update
SearchAnalysis.StemmerandSearchAnalysis.Stemmerconfig setting inseeker.config
- Remove
Upgrading from a previous version
- Un-install your existing version of Seeker
- Install the new version of Seeker
- Edit the seeker.config file, setting the value for seekerWebService.attachmentDirectoryPath
- Edit the seeker.config file, setting the value for seekerWebService.attachmentMode
Version 2.5.0
Enhancements
Add support for handling uploads of file attachments. This is typically used in conjunction with Dovetail Agent (version 19 or higher).
New APIs
Attachment Upload Token - This provides a token that will be used for the actual upload of a file attachment.
Attachment Upload - The Attachment File Upload API is for application users to upload a file attachment. Dovetail Seeker will save the file to the file system, and create the attachment records (doc_inst and doc_path) in the database for the appropriate workflow entity.
New Config Settings
seekerWebService.attachmentDirectoryPath - The base path where file attachments should be stored when using the Attachment Upload API.
seekerWebService.attachmentMode - The AttachmentMode specifies which sub-folder mode should be used when saving file attachments using the Attachment Upload API. Valid values are ModeA, ModeB, or ModeC. For specific details, refer to the AttachmentMode Knowledgebase Article
Version 2.4.1
Bug Fixes
- "Index was outside the bounds of the array" error when trying to add an item to a dictionary within the InMemoryFileDownloadTokenRepository
Version 2.4.0
Add support for Seeker to act as a file resource store, allowing for generic uploading of files, and using SeekerProxy for downloading of files with use of a URL that contains a token with a set lifetime (expiration date). This is typically used in conjunction with Dovetail Agent (version 9 or higher), and Dovetail Rulemanager (version 1.6 and higher).
New Resources API added.
Installer now supports Windows 10 / IIS 10
Version 2.3.1
Update the web service's administrative web site to show the Service Name, and the Instance Name when multiple Seeker Indexer Services are running on the same server. See the Upload Process documentation for details.
Bug Fixes
Fixed problem with the Spell Check API not handling POST requests.
Version 2.3.0
Add support for direct file uploads files to Dovetail Seeker. See the Upload Process documentation for details.
Add documentation for File Download APIs.
Internet Information Services (IIS) 7.0 is now required:
- To support file uploads the File Proxy implementation has been changed to use Microsoft's Application Request Routing (ARR) add-on to Internet Information Services (IIS) and this add-on requires IIS 7 or greater.
- Please see the IIS Setup Guide for help setting up Application Request Routing.
Bug Fixes
Fixed problem with web service failing to start up when Spell Check API configuration settings are incorrect.
Fixed file download API bug where file names with special characters were not getting correctly encoded.
Domains removed from the document specification will now get immediately removed from the index.
Version 2.2.1
Fixed slowness that can occur when checking for files that do not exist on network shares.
Fixed bug where removing a search domain would leave a config file in the search index directory.
Fixed exceptions that could occur during shutdown.
Add debug logging around setting index timestamps and message consumer setup.
Version 2.2.0
The web service's administrative web site has been updated with more contemporary technology and a better user experience.
Recent versions of Windows Server are more restrictive when writing files to the [Program Files] directory. To simplify configuration, the installer now defaults the installation directory to [WindowsInstall]\Dovetail\Seeker.
Fixed an issue with multi-path expansion, which could result in the index having incorrect data.
Specifically, if a custom field was defined that traversed multiple paths, such as:
<path>case_reporter2site:primary2bus_org:bus_org2usr_bus_role:usr_bus_role2user:login_name</path>
Then in certain instances if the path evaluated to nothing, the index could contain the data from the previously indexed object.
Many application dependencies have been updated.
Version 2.1.5
Requirements
Dovetail Seeker now requires the Microsoft .Net 4.0 Framework Full Edition.
Web Service
Search results once again return a score usable by search clients implementations.
Re-indexing a search domain using the Seeker administrative web application no longer displays an error.
Document specifications Changes
Customers document specification (for the contact table) now excludes 'dummy' contacts.
Subcase document specification is now configured to index subcase attachments.
Version 2.1.3
File documents whose text cannot be extracted will now create empty search index documents. Previously these files were not included in the search index preventing them from being served by the Seeker File Proxy.
The global last index update time stamp (shown on the administrative web site and in search results) is now updated on every check for new items to index, not just when items are indexed.
When the document specification is modified the indexing service will refresh cached Clarify data.
Dovetail Seeker has been certified to work with Oracle 11.
Installer will no longer prevent installation when only .Net 4.0 is present.
Version 2.0.12
Corrected the logging configuration for Seeker Console.
Search web service exceptions now return as JSON when the requesting web client has set the HTTP header X-Requested-With to the value XMLHttpRequest. This is useful when the client wishes to consume the error message as JSON rather that display the normal HTML error page.
Version 2.0.0
We've added a lot of new and popularly requested features to Dovetail Seeker 2.0.
Rich Document Indexing
We have added the ability to index and search the contents of rich documents such as Portable Document Format (PDF) or Microsoft Word documents
- Dovetail Document Specifications now allow you to index attachments. This means the contents of your Dovetail case attachments can be indexed and are now searchable.
- We have added File Document Specifications allowing you to have Dovetail Seeker index rich documents found in any directory to which the indexer has read access.
- Dovetail Seeker can serve indexed attachments and files using the included Dovetail Seeker File Proxy allowing users to easily download the files they've found using Dovetail Seeker.
New Architecture Benefits
We are now using a message oriented architecture for document indexing. This means that Dovetail Seeker is easier for us to maintain. Better yet it's performance has markedly improved.
Another benefit is that you can now re-index individual dovetail or file specifications. In fact, modifying the document specification XML will cause affected document specifications to automatically be re-indexed.
The Windows Service now watches for changes to your Document Specifications to ensure your index documents are always consistent.
New APIs
We have new search and spelling related APIs.
The Terms API allows you to see what search terms in your index match text a user is typing. We've used this API in our search client example to give search clients auto complete capabilities in their search text box.
Spell Check API allows Dovetail Seeker using web applications to do client or server side spell checking.
Our Term Suggest API combines both the Terms and Spell Check API to give you alternative search term suggestions for misspelled search terms in queries.
Web Client Example
We now include web client example application which can be used to try out Dovetail Seeker features.
Version 1.5.1
Fixed a bug related to how new or updated Dovetail objects are found. A potential gap was present where objects created or modified would not be found by the next index update.
Note: We recommend a re-index of your Dovetail Seeker search index to correct for any missed Dovetail objects.Version 1.4.2
During indexing when document creation fails for some reason the indexer will now attempt to retry indexing that document. This is an effort to avoid scenarios where a lost database connection could ruin a long running index operation such as the initial the index creation.
The indexer's data access technique has been updated to be more efficient about the number of queries it does resulting in a significant performance boost to the number of objects indexed per second.
The document specification XML schema definition is now included.
Version 1.4.1
Dovetail Seeker now uses the current date of your Clairfy/Dovetail database instance when setting the last index update timestamp of your search index. This corrects a problem in certain situations where indexing recently modified items could be delayed.
Seeker Console now runs faster for operations that do not touch the database.
Index optimization is now done less aggressively. Optimization is only done after a configurable number of documents have been added to the search index. Please see Configuring Dovetail Seeker for more details.
An optimize command has been added to the console application to allow administrators to force index optimization.
Additional document specification meta data has been added. Document Specifications and custom fields now have optional description and tags metadata attributes.
Administrators wishing to avoid errors returning from queries containing wildcards can now control how many terms are allowed in wildcard queries.
The version of Lucene used by Dovetail Seeker has been updated to version 2.4.1.
Dovetail SDK dependency updated to version 2.4.4.
Version 1.3.2
It is now possible to install multiple Dovetail Seeker indexing windows services on a server. Please see Seeker Windows Service for more information.
Added a new configuration setting allowing configuration of the timezone of the Dovetail SDK session used during indexing. This should be set to match the timezone of the Windows host if it differs from the database's default timezone.
Search client example was missing a source file.
Version 1.3.1
Packaging changed to include support files and documentation for Dovetail Seeker integration with Dovetail Mobile Agent.
Version 1.3.0
New Search Web Service Capabilities
- Search results can now include custom search fields upon request.
- Search results can optionally be sorted by a custom non tokenized field.
- Added an API for exposing search service capabilities.
See Dovetail Seeker Web APIs for more details about these new web service parameters. Also please see Custom Fields for more details about changes made to the indexer to accommodate these new capabilities.
Dovetail Seeker now includes an optional document specification for supporting contact search. This document specification can be used by Dovetail Agent and is required by Dovetail Mobile Agent. This document specification requires a schema update before it can be used. For more details please see Updating the Clarify Schema For Contact Search.
Bug Fixes
Fixed a bug in the search client library where it was not deserializing search results from the web service correctly.
Fixed a bug when reindexing with SeekerConsole and the index directory does not exist.
Installer now configures the web service application on IIS6 and earlier to correctly include the wildcard for the ASP.Net ISAPI handler.
Added missing web service API documentation for the Document Specifications API.
Version 1.2.0
Important Changes
- Dovetail Seeker now requires version 3.5 SP1 of the .Net Framework.
- Seek.exe has been renamed to SeekerConsole.exe
- Application settings are now located in the install directory within the applicationSettings.config file.
New Features
Dovetail Seeker now includes a Windows service for keeping your search index up to date. For more information see Seeker Windows Service.
Dovetail Seeker can now index Clarify views. Documentation updated to give examples and caveats about basing document specifications on views.
The Seeker Console application can now re-index your search index. This is useful to remove content from your search index after database purge.
Bug Fixes
Seeker Web clients doing searches are now directed to avoid caching search results.
Documentation added about Search Query Syntax.
Version 1.1.0
Documentation added with information on the Seeker Search Web Service API.
Added client-example directory to the installation directory. This directory now contains source code and assemblies for an C# Seeker client. Please view the ReadMe.txt file in that directory for more information.
Added new value RequestedNumberOfResults to the search results information returned by the search service. This value reflects the number of search results requested by the search client. This was added to make pagination of search results easier.
Search web application now takes maximumSummaryLength as an optional parameter to allow search clients control over the size of the search result payload.
Installation
Requirements
| Item | Details |
|---|---|
| Operating System |
|
| Web Server |
|
| Microsoft .Net Framework 4.7.2 |
|
| Database platforms |
|
| Microsoft Message Queueing (MSMQ) |
|
IIS Setup Guide
Dovetail Seeker requires IIS 7 or greater. It also requires that certain IIS features be enabled and add-ons installed and configured. Please follow this guide to ensure that your IIS web server is setup correctly.
Server Role and Features
Ensure that your Windows Server has the Web Server (IIS) role installed and the following features enabled.
- Application Development: ASP.Net and .Net Extensibility.
- Management Tools: IIS 6 Management Compatibility
Install and configure Application Request Routing
Dovetail Seeker exposes a few APIs for public use. These APIs need to be proxied so that only they are exposed to public Internet users. Dovetail Seeker uses Application Request Routing to do this.
- Install the Web Platform Installer (WPI). Note: your server may already have WPI installed.
- To check, open IIS Manager.
- Click on your root IIS server node (has the server name as the title)
- Double click on Management -> Web Platform Installer.
- Search the Web Platform Installer for Application Request Routing.
- Add Application Request Routing 3.0 or greater.
- Click on your root IIS server node (has the server name as the title)
- Double click on IIS -> Application Request Routing
- Click on Server Proxy Settings... in the right sidebar.
- Click Enable proxy to turn on ARR's ability to proxy.
- De-select Enable disk cache to turn off caching as it is not needed.
- Click Apply.
Installation
Before you begin please ensure that you have IIS 7 or greater installed.
Dovetail Seeker
The Dovetail Seeker installer will add a virtual directory named seeker and create a Windows Service named Dovetail Seeker Indexer.
- Run the Dovetail Seeker.exe file. The setup program displays the welcome page of the Dovetail Seeker setup wizard.
- Click Next.
- The End-User License Agreement page appears.
- If you accept the terms in the License Agreement, click Next.
- The installation location page appears.
- Click Next to accept the default installation path, or enter a custom installation path.
- Enter the database credentials to the Dovetail CRM or select Skip database settings, click Next.
- Select the Web Site where the Seeker Web Service will be installed, click Next.
- Enter in the URL for the Seeker Proxy for downloading attachments, click Next.
- Optionally select Show specifications after install to show documentSpecifications.xml file after installation.
- To complete the installation, click Install.
- Optional - Update The Clarify Schema for data restriction support.
- Configure the Indexer.
- Create an index.
Dovetail Seeker File Proxy
The Seeker File Proxy installer will add a virtual directory named seekerproxy to the website.
- Run the Dovetail-Seeker-Proxy.exe file
- The setup program displays the welcome page of the Dovetail Seeker setup wizard.
- Click Next. The End-User License Agreement page appears.
- If you accept the terms in the License Agreement, click Next. The installation location page appears.
- Click Next to accept the default installation path, or enter a custom installation path.
- Select the Web Site where the file proxy will be installed, click Next.
- Enter the location of the Dovetail Seeker Web Service, click Next. The ready to install page appears.
- Verify settings. Optionally select Show configuration after install.
- To complete the installation, click Install.
If you need to manually configure Seeker File Proxy take a look at Configuring File Proxy.
Apply Schema Changes
Dovetail Seeker uses custom tables for file resources and tokens. These tables must be added to your schema.
You can change the Clarify schema with either Dovetail's SchemaEditor or Clarify's DDEditor.
Prior to making schema changes, backup the current database.
To make these changes using Dovetail SchemaEditor:
- Edit the .SchemaEditor file
- Set the database connection information.
- Set the inputFilePath to seeker.schemascript.xml
- Preview the changes (SchemaEditor.exe -p).
- Apply the changes (SchemaEditor.exe -a).
Migrating From Dovetail Seeker 1.x
We have put a lot of effort into improving the Dovetail Seeker 2.0 installation experience. Here are some important considerations for our customers already using Dovetail Seeker 1.x.
Easier Upgrades
If you already have Dovetail Seeker 1.x installed there is no need to uninstall 1.x. Simply follow the installation guidance and Dovetail Seeker will be upgraded to 2.0.
During the installation your original document specification XML file (documentSpecification.xml) and application configuration will be backed up.
Also during the upgrade you will be prompted for the particulars of your database and web site settings which should hopefully do a good job of keeping you out of the configuration file. You may still need to to migrate some of your configuration settings over to the new configuration file.
Changes To Configuration Settings
In Dovetail Seeker 2.0 the application.config configuration file has been renamed to seeker.config. We have consolidated all application settings into one file. Take care when migrating previous configuration settings to this new file. Be aware that each configuration setting's name has changed to help better organize them. For example seeker.fileSystemIndexDirectory has become seekerCommon.fileSystemIndexDirectory. Settings are organized into the following areas:
- seekerCommon
- seekerIndexer
- seekerWebService
Document Specification Changes
When you are migrating your old Document Specifications be aware that the new indexAttachments element is required to enable attachment file indexing for Dovetail Document Specifications.
Configuring Dovetail Seeker
The Dovetail Seeker Service, Console, and web service are set up by default to use the same configuration file, seeker.config. You should only need to edit the database connection information. For more configuration information, see Other configuration properties section.
To edit the settings:
- Go to the directory where you installed Dovetail Seeker. The default directory is C:\Program Files\Dovetail Software\Seeker
- Go to the config directory
- Open seeker.config file in your favorite text editor.
Indexer Configuration
The seeker.config file defines all the application settings for the indexing applications.
| Key | Required | Default | Description |
|---|---|---|---|
| seekerIndexer.databaseType | Yes | mssql | Specifies the type of provider ClarifyApplication should to connect to the DB. Standard values are "MSSQL", "ORACLE", or "ODPNET". |
| seekerIndexer.databaseConnectionString | Yes | Data Source=server; Initial Catalog=clarify; User Id=user; Password=password; or: Integrated Security=SSPI; Persist Security Info=True; |
Important: Before Integrated Security can be used a server set up procedure must be followed, see Integrated Security with Dovetail server applications for details. |
| seekerIndexer.ApplicationUsername | Depends | emptyString | A valid Clarify username used by the application. Used only when Integrated Security is specified in seekerIndexer.databaseConnectionStringMust have a value when Integrated Security is to be used |
| seekerCommon.fileSystemIndexDirectory | Yes | [Installation Path]\seekerIndex | Where should the indexer create/update the search index |
| seekerCommon. documentSpecificationsFilePath |
Yes | [Installation Path]\config\documentSpecifications.xml | Where should the indexer look for document specifications configuration |
| seekerIndexer. dovetailDocumentPollingFrequencyInSeconds |
Yes | 15 | How often should the database and filesystem be polled for objects that have been updated |
| seekerIndexer. fileDocumentPollingFrequencyInSeconds |
Yes | 120 | How often should the database and filesystem be polled for documents that have been updated |
| seekerIndexer. maxUpdatesPerMessageInDovetailDocumentMessage |
No | 100 | Document updates batch size |
| seekerIndexer. maxUpdatesPerMessageInFileDocumentMessage |
No | 25 | File document message batch size |
| seekerIndexer. fileDocumentValidationPollingFrequencyInHours |
Yes | 3 | How often should file documents based on deleted or moved files be removed from the index |
| seekerIndexer. documentSummaryFieldLength |
No | 1000 | How many charcters should be included in the summary field of dovetail and file documents |
| seekerIndexer. numberOfIndexChangesBeforeOptimization |
No | 1000 | How often the index is optimized |
| seekerIndexer. numberOfIndexSegmentsAfterOptimization |
No | 3 | Number of index segments after index optimization |
| SearchAnalysis.StopWords | No | Comma delimited list of words | Comma delimited list of words which the indexer should skip when indexing |
| SearchAnalysis.Stemmer | No | emptyString | The algorithm Seeker will use to reduce words to their stem |
Database settings
If you skipped the database settings section during the install, you must edit a configuration file which tells Seeker how to talk to the Dovetail CRM database. Optionally, you can control where index files are created and how often the Seeker Service updates your index.
- Edit the seekerIndexer.databaseType node to be either 'mssql' or 'oracle' depending on your database platform.
- Edit the seekerIndexer.databaseConnectionString node to contain a valid database connection string that has at least read access to your Dovetail CRM database. It may contain
Integrated Security=SSPI; and Persist Security Info=True;instead ofUser Id=user; Password=password;.
Important: We advise that you limit the database credentials used for running indexing applications to be read-only.
Where Is The Seeker Index Located?
Optionally, you can change the location of the seekerCommon.fileSystemIndexDirectory to control where the search index will be created. Be aware that the Seeker web application will need to have at least read access to this path.
What is Indexed Out of the Box?
Dovetail Seeker is shipped with a predefined set of specifications about what Dovetail CRM entities to index. These specifications are defined in an XML configuration file.
You can use the seekerCommon.documentSpecificationsFilePath in the configuration file to control the location where indexing applications look for document specifications. This should be an absolute path.
How Often Should the Seeker Service Update Dovetail Specifications?
The Seeker Service by default checks to see if the search index needs updating Dovetail CRM entities every 15 seconds and file documents every 120 seconds (2 minutes). You can change the value of the seekerIndexer.dovetailDocumentPollingFrequencyInSeconds entry to be the number of seconds you want Seeker Service to wait between index updates for Dovetail CRM entities and seekerIndexer.fileDocumentPollingFrequencyInSeconds for file documents.
How Many Documents Get Updated Per Message?
The Dovetail Seeker Service automatically batches up the number of document updates per Dovetail CRM message to 100 and file document message to 25. You can change the value of seekerIndexer.maxUpdatesPerMessageInDovetailDocumentMessage entry for Dovetail CRM entities and seekerIndexer.maxUpdatesPerMessageInFileDocumentMessage for file documents. If either entry is left blank, the service will not batch updates and do them all at once.
How Often Should Invalid File Documents Get Removed?
The Dovetail Seeker service automatically removes file documents from the index that have moved or been deleted. The default time for removing the invalid files from the index is 3 hours. You can change the value of seekerIndexer.fileDocumentValidationPollingFrequencyInHours entry.
How Many Characters Should Be Included In Every Document's Summary Field?
To avoid bloating the index with extremely large document summaries it is recommended to limit the number of characters included from the file being indexing in the summary field of the document. You can change the value of seekerIndexer.documentSummaryFieldLength to control the number of characters included in the file document's summary field.
After How Many Document Updates Should The Index Optimized?
By default the Seeker Service will only optimize the search index after 10000 documents have been added or updated in the search index. You can change the value of seekerIndexer.numberOfIndexChangesBeforeOptimization entry to be a numeric value representing the number of documents that need to be changed before the index will be updated.
How Many Index Segments Should The Index Be Optimized To?
When the index is optimized Lucene works to reduce the number of index segments. For ideal search performance the number of index segments is one. This setting seekerIndexer.numberOfIndexSegmentsAfterOptimization defaults to 3 segments in an attempt to strike a balance between search performance and index optimization time. If you experience long index optimization times you should increase this value. If you would like to boost your search performance reduce this value to 1.
Stop Words
SearchAnalysis.StopWords is a comma delimited list of words which the indexer should skip when indexing.
Stemming
SearchAnalysis.Stemmer is the algorithm Seeker will use to reduce words to their stem. (e.g. Cases -> Case, captured -> capture) Valid options are: Porter, Snowball, or an empty string (which will not use a stemmer).
Logging Configuration
Logging is done using log4net and is configured by editing the log4Net configuration in the log4net.config file. All logging output defaults to the logs directory under the installation location.
Logging capabilities include:
- Different log levels: Debug, Info, Warning, Error, and Fatal
- Can log to: File, Database, Windows Event Log, Email, several other sources, or any combination of these
- Set maximum log file size, number of file rollovers, etc
- Configurable log output (date/time format, log source, etc)
- Dynamic configuration: Make changes on-the-fly, without re-starting your application
Default location for indexing applications: [InstallDir]\indexer\logs
Default location for web service: [InstallDir]\webservice\logs
Logging For File Document Indexing
When rich documents, such as word and PDF files, are being indexed a Text Extraction library is being used. This library has logging infrastructure which is unfortunately different than log4net. By default we have the configuration of this alternate logging infrastructure hard coded to log all errors to the following log file:
[InstallDir]\indexer\logs\text-extraction-errors.log
If you wish to customize the logging of this library you can create a log4j.config file according to the log4j manual and put it into the indexer's application directory.
[InstallDir]\indexer\log4j.config
Web Service Configuration
The seeker.config file defines all the application settings for the Web Service
| Key | Required | Default |
|---|---|---|
| seekerWebService.luceneMaximumClauseCount | No | 1024 |
| seekerWebService.fileStoreDirectoryPath | No | null |
| seekerWebService.fileDocumentProxyBaseUrl | No | http:// |
| seekerWebService.fileProxyTokenTimeoutPeriodInSeconds | Yes | 300 |
| seekerWebService.spellingDictionaryFilePath | Yes | [Installation Path]\webservice\dictionaries |
| seekerWebService.spellingNativeDllFilePath | No | The spellingDictionaryFilePath setting path. |
| seekerWebService.defaultResourceTimeout | No | 7 days |
| seekerWebService.attachmentDirectoryPath | No | null |
| seekerWebService.attachmentMode | No | ModeB |
Important: If Integrated Security is to be used with Seeker Indexer the Seeker Web Service must be also configured accordingly, see Integrated Security with Dovetail server applications for details.
Configuring Lucene's Maximum Number Of Search Terms
Lucene limits the number of search terms in a search query. The default maximum search term limit is 1024 search terms. The reason this limit exists is to keep complex search queries from slowing down search requests. The most common form of this problem is queries using wildcards on terms with few characters. For example a search query of a* against an index of respectable size will almost always result in a Too Many Clauses error.
Administrators wishing to allow users to search broadly can change this limit to be a larger number. How large this needs to be depends on your index.
You can change the maximum search term limit by enabling and changing the seekerWebService.luceneMaximumClauseCount entry.
Note: Be aware that the maximum search term limit is there for a reason and raising it may impact your search performance.
File Store Directory Path
The Seeker Web Service supports file uploads. Files uploaded will be saved into a directory structure under this local or UNC file path. You can change the value of seekerWebService.fileStoreDirectoryPath entry to represent the location of where you wish files to be saved. You may wish to set this to a directory under your existing Clarify attachments directory.
File Document Proxy URL
The Seeker Web Service Search API returns a paths to a file proxy for file documents. The default URL is entered during the installation. You can change the value of seekerWebService.fileDocumentProxyBaseUrl entry to represent the location of the file proxy.
File Token Timeout
Search results that contains files are associated with a token that times out for security reasons. The default timeout for the tokens is 300 seconds (5 minutes). You can change the value of seekerWebService.fileProxyTokenTimeoutPeriodInSeconds entry to a numeric value representing the number of seconds for a token to timeout.
Spelling Dictionary Path
The Dovetail Seeker Web APIs includes a spell check service that requires a path to the dictionary files. The default path is the installation location of the web service (c:\Program Files\Dovetail Software\Seeker\webservice\dictionaries). You can change the value of seekerWebService.spellingDictionaryFilePath entry to path of the dictionary files.
attachmentDirectoryPath
The base path where file attachments should be stored when using the Attachment Upload API.
attachmentMode
The AttachmentMode specifies which sub-folder mode should be used when saving file attachments using the Attachment Upload API. Valid values are ModeA, ModeB, or ModeC. For specific details, refer to the AttachmentMode Knowledgebase Article
web.config
The web.config file defines .NET specific settings for the Web Service. Most settings in this file will be left unchanged.
You may wish to alter the following settings for your specific environment.
| Setting | Default Value | Description |
|---|---|---|
| system.web --httpRuntime ----maxRequestLength |
10241 | maxRequestLength for asp.net, in KB. Controls file upload size limits. For more information: Controlling upload file size in ASP.NET applications |
| system.webServer --security ----requestFiltering ------requestLimits --------maxAllowedContentLength |
10485760 | maxAllowedContentLength, for IIS, in bytes. Controls file upload size limits. For more information: Controlling upload file size in ASP.NET applications |
Backups
Dovetail Seeker
Uninstalling Dovetail Seeker creates backups of documentSpecifications.xml and seeker.config files in the config folder of the installation directory.
The default location is C:\Program Files\Dovetail Software\Seeker\config
The backup configuration files are renamed with the suffix backup.[yyyy-MM-ddThh-mm-ss].
The following is an example of a backup file for documentSpecifications.xml on 07-28-2010 at 9:22 am:
documentSpecifications.xml.backup.2010-07-28T09-22-03
Reinstalling Dovetail Seeker
If you reinstall Dovetail Seeker, the backup files do not overwrite the new files. It is at your discretion to overwrite the default configuration files with the backup files.
Configuring File Proxy
You should not need to do anything manually here as the Seeker file proxy installer should automatically configure the proxy settings. If you do run into problems downloading or uploading files you can use this guide to manually configure the proxy.
The Seeker file proxy installer creates a seeker file proxy web application. The web.config of this web application should be automatically configured by the installer. If you need to manually change these settings use the following guidance.
The file proxy currently proxies two Dovetail Seeker web service APIs.
- File Download API
- File Upload API
Editing the file proxy web.config
The following is the
<rewrite>
  <rules>
    <rule name="Seeker File Upload" stopProcessing="true">
      <match url="^file/upload" />
      <action type="Rewrite" url="@URL@/file/upload" />
    </rule>
    <rule name="Seeker File Download" stopProcessing="true">
      <match url="^file/download" />
      <action type="Rewrite" url="@URL@/file/download" />
    </rule>
  </rules>
</rewrite>
The only text you may need to customize is the @URL@ placeholder. Occurrences of @URL@ need to be replaced with the Seeker web service API. The installer defaults it to http://localhost/seeker.
Document Specifications
Document specifications are defined using XML. The location of this specification file defaults to your documentSpecification.xml in your seeker config directory.
Dovetail Seeker indexing applications use document specifications like a set of instructions. There are two types of document specifications:
- The Dovetail Document Specification tells the indexer how to transform a Dovetail CRM entity from database records into a dovetail document in the index.
- The File document specification tells the indexer the location of files whose text will be extracted and used to created file documents in the index.
All specifications have optional description and tag values.
Important: Be aware that when using the Dovetail Seeker Windows Service that changes to your document specification file will immediately affect your index.
Find out more about Specification Change Detection.
Visual Studio Intellisense
You can use any text editor to edit the file. We recommend you use Visual Studio to enable intellisense for editing the file. Visual Studio gives you hints to what nodes are available and errors when the file is invalid.
The DocumentSpecifications.xsd in your seeker administrator directory is an XML schema file to validate the document specification file. Visual Studio can use this file to enable intellisense to help edit the document specification file.
To enable the XSD in Visual Studio, copy the file to the schema folder in your Visual Studio installation path: C:\Program Files\Microsoft Visual Studio 9\Xml\Schemas (or "Microsoft Visual Studio 8" for VS2005, etc.).
Dovetail Document Specifications
Dovetail document specifications define how the Dovetail Seeker indexer will create and update index documents based on the contents of your Dovetail CRM application. For example using the included Dovetail document specification for the case entity in your Dovetail CRM you will have one document in your search index for each case present in your CRM (which matches the document selection criteria).
Each Dovetail document specification defines:
- Identification Fields - Which Dovetail CRM entity will be indexed and how to uniquely identify it.
- Document Selection Criteria - How to select from all CRM entities present which ones need to be indexed.
- Required Fields - What information which should be searchable by default and what should be returned with search results.
- How to find file Attachments related to each entity.
- Custom Fields - What additional information should be searchable for the entity.
Example
The following is the document specification for Solutions.
<dovetailDocumentSpecification description="Cases in your CRM" tags="workflow">
  <identification displayName="solution" table="probdesc" idColumnName="id_number"/>
  <documentSelectionCriteria><![CDATA[creation_time > ${lastIndexUpdate} OR modify_stmp > ${lastIndexUpdate}]]></documentSelectionCriteria>
  <title xml:space="preserve"><path>title</path></title>
  <summary xml:space="preserve"><path>description</path></summary>
  <indexAttachments path="probdesc2workaround:wa_attch2doc_inst"/>
  <contents>
    <path>id_number</path>
    <path>title</path>
    <path>description</path>
    <path>probdesc2workaround:description</path>
  </contents>
  <customField title="public" description="Flag indicating the solution is public. ('1' means yes)" tags="boolean,true:1">
    <path>public_ind</path>
  </customField>
</dovetailDocumentSpecification>
Fields
Each document specification has three types of fields each exposing a way to search for the object being indexed.
- Identification Fields which are used to ensure that the document being indexed is unique and can be searched for by identifier.
- Required Fields hold the default search contents along with what will be displayed with search results.
- Custom Fields which are optional fields exposing alternative ways of searching for the object being indexed.
Fields are composed of a mix of text and one or more paths used to define a way to retrieve data from Clarify for the object being indexed.
Identification Fields
When updating the index, the indexing applications need to make sure that only one document per entity is indexed. This is important as it would not be very useful to have multiple search result for the same case.
The <identification/> node describes how to uniquely identify a Dovetail CRM entity in the index. During indexing three identifying index document fields are created: domain, id, and uri fields. Adding these standard identifying fields to each index document allow a single search index to contain many different types of entities while still be able to uniquely identify them in search results and during indexing.
Clarify Table Example
<identification displayName="solution" table="probdesc" idColumnName="id_number"/>
In this situation, the indexing applications know to create solution documents in the index that are identified by the id_number column on the probdesc table.
Search results matching solution documents will have the following identification fields:
| Field | Value | Description |
|---|---|---|
| scheme | dovetail | Documents created for Dovetail CRM entities always have a scheme of dovetail. |
| domain | solution | The displayName of the specification. |
| id | <'id_number' column value> | Contains the value from the probdesc table's id_number column for the solution. The contents of this field come from the database column name specified in the idColumnName attribute. Note: The document specification must be configured so that documents generated are unique. You should make sure you specify an idColumnName for the object being indexed that is unique. |
| uri | dovetail://solution/ |
To uniquely identify each document, the three identifying fields above are formatted into this single field. |
Clarify View Example
<identification displayName="site" table="site_view" idColumnName="site_id"/>
In this situation, the indexing applications know to create site documents in the index that are identified by the site_id column on the site_view view.
Search results matching site documents will have the following identification fields:
| Field | Value | Description |
|---|---|---|
| domain | site | The display name of the specification. |
| id | <'site_id' column value> | Contains the value from the site_view view's site_id column for the solution. The contents of this field come from the database column name specified in the idColumnName attribute. Note: The document specification must be configured so that documents generated are unique. You should make sure you specify an idColumnName for the object being indexed that is unique. |
| uri | dovetail://site/ |
To uniquely identify each document, the three identifying fields above are formatted into this single field. |
Note: When using a Clarify view as the base "table" of a document specification, required and custom field paths cannot traverse relations.
Required Fields
There are three required fields: title, summary, and contents.
Example Required Fields
Here are the required fields for the solution document specification:
<title xml:space="preserve"><path>title</path></title>
<summary xml:space="preserve"><path>description</path></summary>
<contents>
  <path>id_number</path>
  <path>title</path>
  <path>description</path>
  <path>probdesc2workaround:description</path>
</contents>
Search Result Fields
The title and summary fields will always be returned with search results. Depending on how you are displaying search results the formatting of the title and summary fields may be important. Notice the xml:space attribute which tells the XML parser to preserve the whitespace of the title and summary field specifications.
Content Field
The content field is very important as it is the default field used when searching your index. The contents field should contain all details about an entity that you wish to be searchable by default. The data indexed for the content field is not stored in your search index as it can get quite large and is not intended to be displayed to the search user.
Note: When using a Clarify view as the basis of a document specification, field paths cannot traverse relations.
Custom Fields
Custom fields are extra aspects of the entity you wish to be searchable. Custom field values are not returned with search results unless you request the search web service to do so.
<customField title="public">
  <path>public_ind</path>
</customField>
With this field in place, a search query can now filter out private solutions. Here is an example of a search for a solution using the public custom field:
>SeekerConsole.exe --search "domain:solution AND public:1"
The case specification shipped with Dovetail Seeker has a few more examples:
<customField title="part">
  <path>case_prt2part_info:part_info2part_num:part_number</path>
  <path>case_prt2part_info:part_info2part_num:description</path>
</customField>
<customField title="site">
  <path>case_reporter2site:name</path>
</customField>
<customField title="contact">
  <path>case_reporter2contact:first_name</path>
  <path>case_reporter2contact:last_name</path>
</customField>
These custom fields allow you to search for cases related to a particular part, reported by a site, or by a contact's name. Here is a more complex example that searches multiple fields:
>SeekerConsole.exe --search "(part:Seeker AND site:Dovetail) OR contact:Jones"
Note: When using a Clarify view as the basis of a document specification, field paths cannot traverse relations.
Storing Field Values
By default custom field values are stored in the index making them available when requested in search results. If custom search result values are not needed it is possible to reduce the size of your search index by turning off for your custom fields.
<customField title="site" isStored="false">
  <path>case_reporter2site:name</path>
</customField>
In this example the isStored attribute of the customField element is set to false. Telling the indexer that these field values should not be copied into the search index.
Tokenizing Field Values
By default custom field values are tokenized to best allow the indexer to do its work. This is usually the desired behavior. However when sorting search results by custom fields it is required that the custom field should not be tokenized.
This can be accomplished by setting the optional isTokenized attribute on the customField element to false.
<customField title="contactSortOrder" isTokenized="false" isStored="false">
  <path>case_reporter2contact:last_name</path> <path>case_reporter2contact:first_name</path>
</customField>
In this example a custom field is being added to be used for sorting search results by a contact last and then first name. Notice that this field is not stored in the index as its only reason for existence is for search result sorting.
Description and Tags Field Values
Like document specifications custom field specifications can have description and tags attributes used to describe and categorization of the custom field. This information is relayed to the search client when Document Specifications are retrieved.
<customField title="created" description="Date the case was created." tags="rangeable,date">
  <path>creation_time</path>
</customField>
The Description could be used by a dynamic search client to communicate to the user what this custom field is intended to search for. The Tags field could be used to create a taxonomy of search fields. In the example above we are tagging the field as a date and informing the client that range queries would work well with this field.
Paths
Paths are used within document fields to populate the search index with data about the Dovetail CRM entity being indexed. Paths start from a base table and walk across entity relations until they end up at a database column name.
Note: When using a Clarify view as the base table of a document specification, field paths can only be field names present on the base view.
All required and custom fields should contain one or more paths.
Path Examples
Below is an example of a path for a solution document specification.
<path>probdesc2workaround:description</path>
Notice that the path starts by traversing to a related workaround and resolving to the description field on the workaround table.
The following are legal paths that start from probdesc as the base table:
| Path | Description |
|---|---|
| title | The title of the probdesc being indexed. |
| id_number | The id_number of the probdesc being indexed. |
| probdesc2workaround:description | The description of all the workarounds that are related to the probdesc being indexed. |
| probdesc2workaround:resolution2gbst_elm:title | The title of the resolution of all the workarounds that are related to the probdesc being indexed. |
Paths that expand to have more than one value (one to many relationships) will have all related values put into the field.
Paths Can Be Mixed With Text
It is perfectly fine to mix paths with text. Here is an example of the required field summary for a case document specification:
<summary xml:space="preserve">Case title: <path>title</path>
Owner: <path>case_owner2user:login_name</path>
</summary>
Notice the use of xml:space to preserve white space within the summary field. Without the xml:space attribute it is possible that any whitespace present could be ignored.
Multiple Paths
It is allowed and common to have many paths per specification. Below is an example search contents specification for a case:
<contents>
  <path>id_number</path>
  <path>title</path>
  <path>case_history</path>
</contents>
Notice how the content specification has multiple path elements each mapping to a field on the case table.
Note: If you are familiar with creating properties for rules in Dovetail RuleManager, you are likely familiar with paths.
Attachments
Dovetail Seeker can optionally index Dovetail CRM entity file attachments. When configured to index attachments for a Dovetail document specification file attachments which are found and that the indexer has read access to will have their text extracted and put into a new document in the search index. Each attachment document has a reference to it's parent.
Index Attachment Configuration
To find related Dovetail CRM entity attachments the dovetail document specification has an indexAttachment element with a path attribute whose value defines the path from the Dovetail CRM entity to its related attachments.
This value of the path attribute shows the indexer how to traverse from the entity being indexed to the doc_inst table where attachment records are found.
Security Note: To be able to index attachment contents. Dovetail Seeker indexing
applications must have read access to all Dovetail attachment file paths.
Example
The following example index attachment element configuration specifies the path from the Dovetail CRM case entity to the doc_inst table.
<indexAttachments path="case_attch2doc_inst"/>
Example Case specification with attachments
<dovetailDocumentSpecification description="Cases in your CRM." tags="workflow">
  <identification displayName="case" table="case" idColumnName="id_number"/>
  <documentSelectionCriteria><![CDATA[creation_time > ${lastIndexUpdate} OR modify_stmp > ${lastIndexUpdate}]]></documentSelectionCriteria>
  <title xml:space="preserve"><path>title</path></title>
  <summary xml:space="preserve"><path>case_history</path></summary>
  <indexAttachments path="case_attch2doc_inst"/>
  <contents>
    <path>title</path>
  </contents>
</dovetailDocumentSpecification>
Attachment Index Documents
When the index attachments configuration element is present Dovetail Seeker will create attachment file documents for each of attachment related to the Dovetail CRM entity being indexed.
Attachment Fields
Identification Fields
Scheme
All Dovetail Seeker documents have a scheme field. Attachment documents have a scheme field value of file.
Domain
All Dovetail Seeker documents have a domain field. Attachment documents have a domain field whose value is attachment.
Id
All Dovetail Seeker documents have a id field. Attachment documents have a domain field whose value is the full filesystem path to the attachment.
Attachment For
All attachment file documents have field named attachmentFor whose value is the type of entity the attachment references. For example, an attachment document created by the case document specification will always have an field named attachmentFor whose value is case.
Dovetail Reference
Additionally each attachment file document will have a field named dovetailReference whose value will be the search index URI of the parent Dovetail index document. For example an attachment document created for the Dovetail CRM case entity whose id is "42" will have a URI of dovetail://case/42. Search clients can use this reference value to easily construct a application link to the parent entity in your CRM application.
Parent Document Custom Fields
For certain situations you may wish the custom fields defined in your document specification to be present on your attachment documents. When attachment documents are created all custom fields from the parent search document are copied into the attachment index document. This is done to keep custom fields from your Dovetail documents in context with their attachments.
Example
Search clients often secure access to index documents by filtering search queries. For example it is common to filter out non-public Dovetail CRM solutions documents from public facing knowledge base searches. Your self service application will want to filter the out of the box Solution document specification with a query like this:
((public:1 AND domain:solution) AND <user query>)
This filter will prevent private solutions from leaking out of your search queries. Now because your solution attachment documents will also have their parent document's custom fields you can change your filter to look like this:
((public:1 AND (domain:solution OR domain:attachment)) AND <user query>)
This filter will now include solutions and their attachments in search results.
File Document Fields
All file documents have the following fields present.
Required Fields
Required fields are common to all search documents in your Dovetail Seeker search index.
Summary and Contents
The Summary and Content fields are populated with the text extracted from file being indexed. The length of this text copied to the summary field can be controlled via configuration.
Title
The title field is populated from the extracted file's metadata. When no title is found in the metadata the file name of the file is used.
File Detail Fields
All file documents have the following fields which allow search users to search for file documents by their file specific characteristics.
Path
All file documents have a path field whose value is the full filesystem path to the file which was indexed. Example: \server\share\filename.pdf
This value is used by the Dovetail Seeker Web Service to serve the file when requested to do so.
File Name
All file documents have a filename field whose value is the filename of the file which was indexed. Example: filename.pdf
Extension
All file documents have an extension field whose value is the extension of the file which was indexed. Example: pdf
Content Type
All file documents have a contentType field whose value is the MIME type of the file which was indexed. Example: application/pdf
Content Length
All file documents have a contentLength field whose value is the number of bytes representing the size of the file on disk.
Document Selection Criteria
When indexing, the indexing applications need to be able to determine which Dovetail CRM entities should be indexed.
Example
The following document selection criteria is used for Solutions.
<documentSelectionCriteria><![CDATA[creation_time > ${lastIndexUpdate} OR modify_stmp > ${lastIndexUpdate}]]></documentSelectionCriteria>
The specification's document selection criteria roughly translates into the following SQL query:
SELECT id_number from table_probdesc WHERE creation_time > ${lastIndexUpdate} OR modify_stmp > ${lastIndexUpdate}
It is possible to add additional constraints to the criteria. For example, if you want to make sure you only index public solutions, you could add the following constraints:
<documentSelectionCriteria><![CDATA[public_ind=1 AND (creation_time > ${lastIndexUpdate} OR modify_stmp > ${lastIndexUpdate})]]></documentSelectionCriteria>
Last Index Update - (since we last met)
Dovetail Seeker indexing applications remember when it last indexed each document specification. When the ${lastIndexUpdate} symbol is placed in the document selection criteria, that symbol is replaced with the date that the document specification was last updated.
If a given document specification has not been indexed before, the value 'January 1st 1753' is used. This value should be used to filter out entities that do not need indexing, which will speed up indexing greatly. When indexing does not take very long, you can run one of the indexing applications more frequently which will keep your indexes more up-to-date.
Nullable Criteria Fields
Be aware that when using criteria against database fields which have nullable values that in the examples above records with null values will not be included in the indexer. The recommended way to correct this situation would be to put a date into the row's value rather than NULL.
Criteria Fields With Future Dates
Be aware that Dovetail CRM entities whose criteria fields have values whose timestamp is in the future will trigger an index update with every run of the indexer. To avoid this your should correct the rows with futuristic values to have more realistic values.
Performance - Database Indexes
When you are first indexing a Dovetail Document Specification which is working against a table with a large population and you do not have database indexes on fields used in the document selection criteria, the document selection process could take a long time.
To improve performance we recommend adding database indexes to the database fields used in the document selection criteria.
Important Security Consideration
We recommend that the database dovetail user credentials used to run the indexing applications only have read-only access to the database. A SQL Injection attack is possible, because the indexing applications uses the document selection criteria as part of a SQL where clause.
Dovetail Index Documents
The goal of the Dovetail Seeker indexing applications is to populate an index with documents that capture the essence of entities within your Dovetail CRM. An index document is really a snapshot of what you define as the searchable details of an entity like a Case, or a Solution. Listed below are the components of an index document and its usage.
Documents
A document is something that can be searched. The Dovetail Seeker search results are an array of documents that match the search query and are ordered by their relevance. Documents are just containers for fields. When you search, you are searching the contents of fields in a document.
Fields
A document contains fields that can be searched. For example when searching using this query - title:Seeker - the query is looking for all of the documents in the index that have a field called 'title' that matches 'Seeker'.
Default Field
More than likely users will not want to type out a field name for every search term. When searching without using a field name, the search is performed against the default document field. Seeker defines the default field name as contents. Thus, when searching for Seeker, it is the same as contents:Seeker.
Note: Search terms can include a combination of fields and search operators.Dovetail Seeker Dovetail Document Fields
The following fields are present on all documents created by the indexer:
| Field Name | Example | Is In Search Result | Identifier | Searchable |
|---|---|---|---|---|
| domain | case | Yes | Yes | Yes |
| id | 1234 | Yes | Yes | Yes |
| uri | dovetail://case/1234 | No | Yes | Yes |
| title | The case title | Yes | No | Yes |
| summary | The default case summary is the case_history | Yes | No | Yes |
| contents | 1234 The case title The default case summary is the case_history | No | No | Yes |
Note: For more information on advanced search capabilities,
see the Lucene Query Parser Syntax documentation at
http://lucene.apache.org/java/2_4_1/queryparsersyntax.html.
File Document Specifications
Dovetail Seeker uses the file document specification to enable indexing files that exist on the file system. It searches through the directories listed in the specification and indexes the content of the files it finds. Which files are indexed can controlled by explicitly including or excluding them from the specification.
File document specifications define:
- Directories - One or more directories whose files should be indexed.
- Fields - The specification domain name which is used to administrate and filter file documents.
Security Note: The user the Dovetail Seeker windows service or console is
running under must have access to the paths in the file document specification
in order to index the content.
File Text Extraction
To extract the text for files. Dovetail Seeker uses a library called Apache Tika. Check their website for supported file formats.
Example File Document Specification
The following is a specification for searching for documentation files:
<fileDocumentSpecification description="paths to where your documents live" tags="docs">
  <identification displayName="documentation" />
    <directories>
      <directory path="c:\documentation">
        <include name="*pdf" />
        <exclude name="bigfiles"/>
      </directory>
    </directories>
</fileDocumentSpecification>
This file specification will looks in the directory c:\documentation for all files ending in pdf and will exclude any files that exist in a directory named bigfiles.
Directories
The file document specification can have one or more directory nodes controlling which directories are indexed as a part of this document specification. Each directory can be filtered with include or exclude patterns allowing fine grained control over which files are indexed. Regular expressions can be used for the patterns to allow for maximum flexibility.
Include
<include>
The items to include in the index:
| Attribute | Required | Description |
|---|---|---|
| name | Yes | The pattern or file name to include |
Exclude
<exclude>
The items to exclude from the index:
| Attribute | Required | Description |
|---|---|---|
| name | Yes | The pattern of file name to exclude |
Example
The following specification indexes files with the extension of pdf but excludes any that contains the path secret.
<fileDocumentSpecification description="paths to where your documents live" tags="docs">
  <identification displayName="documentation" />
  <directories>
    <directory path="c:\documentation">
      <include name="*.pdf" />
      <exclude name="secret" />
    </directory>
    <directory path="\\server\share\directory">
      <include name="*.docx" />
      <include name="*.xlsx" />
    </directory>
  </directories>
</fileDocumentSpecification>
The c:\documentation directory will include pdfs, and will exclude any pdfs that have secret in the path.
The \server\share\directory will index only files with the extension docx or xlsx.
Here is a table with example matches based on the above patterns:
| Pattern | Match |
|---|---|
| Matches all files that contain the extension pdf Does match:
Does not match:
|
|
| secret | Matches all files that have secret in the path or filename Does match:
Does not match:
|
| *.xlsx | Matches all .xlsx files |
| *.docx | Matches all .docx files |
If there are no explicit include or exclude nodes, all files will be indexed.Fields
Document fields found on file documents are fixed. The following fields are present on each file document in the search index.
Identification Fields
Scheme
All Dovetail Seeker documents have a scheme field. File documents have a scheme field value of file.
Domain
All Dovetail Seeker documents have a domain field. File documents have a domain field whose value matches the identification element's displayName attribute.
Id
All Dovetail Seeker documents have a id field. Attachment documents have a domain field whose value is the full file system path to the attachment.
File Document Fields
All file documents have the following fields present.
Required Fields
Required fields are common to all search documents in your Dovetail Seeker search index.
Summary and Contents
The Summary and Content fields are populated with the text extracted from file being indexed. The length of this text copied to the summary field can be controlled via configuration.
Title
The title field is populated from the extracted file's metadata. When no title is found in the metadata the file name of the file is used.
File Detail Fields
All file documents have the following fields which allow search users to search for file documents by their file specific characteristics.
Path
All file documents have a path field whose value is the full file system path to the file which was indexed. Example: \server\share\filename.pdf
This value is used by the Dovetail Seeker Web Service to serve the file when requested to do so.
File Name
All file documents have a filename field whose value is the filename of the file which was indexed. Example: filename.pdf
Extension
All file documents have a extension field whose value is the extension of the file which was indexed. Example: pdf
Content Type
All file documents have a contentType field whose value is the MIME type of the file which was indexed. Example: application/pdf
Content Length
All file documents have a contentLength field whose value is the number of bytes representing the size of the file on disk.
Specification Description and Tags
Dovetail and File Document specifications can optionally have description and tags attributes used to describe and categorize specifications. This information is relayed to the search client when Document Specifications are retrieved.
The Description attribute could be used by a dynamic search client to communicate to the searcher why the document specification is present in the index. The Tags attribute could be used to create a taxonomy of document specifications.In the example above we are tagging the field as a workflow object. The search client could use this information to facilitate a custom user interface supporting search by id.
Examples
<dovetailDocumentSpecification description="Cases in your CRM" tags="workflow">
...
</dovetailDocumentSpecification>

<fileDocumentSpecification description="Dovetail Documentation" tags="docs">
...
</fileDocumentSpecification>
Optional - Dovetail Data Restriction Support
Dovetail Software products Dovetail Agent and Dovetail Mobile Agent support a database partitioning technique called Data Restriction. This technique allows a single database to be partitioned into logical, virtual databases. If your organization is using Dovetail's Data Restriction feature you will likely want your search results to be logically partitioned in the same way.
How Data Restriction Works
Data Restrictions are implemented by including five restriction fields in every table or view to be restricted. These fields are always named x_res1 through x_res5. A Dovetail application will add criteria to every database query based on the restriction group of the current user.
When indexing Dovetail database content, using Dovetail document specifications, you need to include these five Data Restriction fields in your search index. This allows searches against your Dovetail index content to be restricted in a similar manner as is done with database queries.
Adding Support For Data Restriction to Dovetail Seeker
We have included example Dovetail Document Specifications for customers using data restrictions. These example specifications add the five data restriction fields to custom fields named res1 through res5. Adding data restriction support for most document specifications simply requires that you un-comment the custom data restriction fields.
Note: Whitespace in the data restriction custom field XML is meaningful.
Please ensure that there is no spacing in the data restriction custom fields.
Search Client Support
The latest versions of Dovetail Agent and <mobileapp> include search clients which support Data Restricted search indexes. These search clients detect which of your document specifications have the tag containing the term dataRestricted. When this term is present data restriction criteria will be automatically added to search request for that search domain.
Some data restricted specificaitons require schema changes. For these you will need to Update the Clarify Schema.
Note: It is important that all data restricted document
specifications contain the tag "dataRestricted".
Update the Clarify Schema
When using data restrictions with Dovetail Seeker it is required to update your Clarify Schema. You can change the Clarify schema with either Dovetail's SchemaEditor or Clarify's DDEditor.
Prior to making schema changes, backup the current database.
To make these changes using Dovetail SchemaEditor:
- Edit the .SchemaEditor file
- Set the database connection information.
- Set the inputFilePath to datarestriction.schemascript.xml
- Preview the changes (SchemaEditor.exe -p).
- Apply the changes (SchemaEditor.exe -a).
To make these changes using Clarify DDEditor:
- Start the DDEditor program.
- To save a copy of the database schema to disk, select Save.
- Edit the saved schema file.
- Edit the datarestriction.sch file. Follow the directions in that file to cut/paste the schema changes into the saved schema file.
- Use the Apply Changes menu item to compile the new saved schema file.
- Exit DDEditor.
Dovetail Seeker Web APIs
Dovetail Seeker's search capabilities are exposed via standard HTTP web requests. Dovetail Seeker search clients will typically make a web request containing a search query against the Search API. The Dovetail Seeker web service returns results as JSON encoded data. JSON results are easily consumed by client web applications or browsers.
The Document Specification API gives your search clients access to information about what is in the search index.
The File API provides support for download and uploading files.
The Spell Check API gives suggestions for misspelled words.
The Terms API will return matching search index terms and their frequencies.
Term Suggestion API will return spelling corrected terms which exist in the search index.
Attachment Upload API provides support for uploading attachments securely to Dovetail Agent.
Search API
Dovetail Seeker exists to enable search against your Dovetail/Clarify CRM application. This API accepts GET or POST actions and executes searches against the index created by the indexing applications and returns results in JSON format.
Suggested Usages:
- Page search result for searches returning many results.
- Sort search results by custom fields.
- Returning custom field values with search results.
Simple Example
Request:
GET /seeker/search?query=test
Response:
{"SearchResults":[<elided for sake of brevity>],"TotalNumberOfResults":0,"RequestedNumberOfResults":10,"StartResultIndex":0,
"SearchQuery":"test","Exception":null,"LastIndexUpdateTimestamp":"2008-10-02T11:16:23"}
POST Example
Your application can use both GET and POST HTTP actions to execute search queries. The example below uses a JSON payload to transmit the query parameters. You could also use a regular web form POSTS (application/x-www-form-urlencoded).
Request:
POST /seeker/search
Headers:
Content-Type: application/json
Payload:
{ query: "test" }
Response:
{"SearchResults":[<elided for sake of brevity>],"TotalNumberOfResults":0,"RequestedNumberOfResults":10,"StartResultIndex":0,
"SearchQuery":"test","Exception":null,"LastIndexUpdateTimestamp":"2008-10-02T11:16:23"}
Pagination Example
It is common that search clients will wish to allow pagination of search results.
Request:
GET /seeker/search?query=VPN&resultCount=1&startResultIndex=2
Response:
{"SearchResults":[<elided for sake of brevity>],"TotalNumberOfResults":2,"RequestedNumberOfResults":1,"StartResultIndex":0,
"SearchQuery":"VPN","Exception":null,"LastIndexUpdateTimestamp":"2008-10-02T11:16:23"}
Result Sorting Example
Search results by default are sorted by relevancy. Sometimes that is not exactly what you want. It is possible to sort search results by a single custom field value.
Note: For a custom field to be sortable it's definition in the custom
field document specification must have tokenization turned off.
Request:
GET /seeker/search?query=VPN&sortedByField=firstName&isSortedAscending=true
Response:
{"SearchResults":[<elided, yet sorted>],"TotalNumberOfResults":22,"RequestedNumberOfResults":10,"StartResultIndex":0,"SearchQuery":"Robert","Exception":null,"LastIndexUpdateTimestamp":"2008-10-02T11:16:23"}
Return Custom Fields Example
Custom field values are normally not returned with search results. It may be desirable in some situations to have custom field values returned with search results. To accomplish this you simply include one or more returnCustomField parameters with the search request.
Request:
GET /seeker/search?query=domain:case+AND+blue&returnCustomField=site&returnCustomField=contact
Response:
{"SearchResults":...,"CustomFields":{"site":"Dovetail Software","contact":"James Miller"}}]...
Search service parameters for /search
| Parameter | Required | Default | Description |
|---|---|---|---|
| query | yes | n/a | The search query |
| resultCount | no | 10 | The number of results to return. Could also be considered the page size. |
| startResultIndex | no | 0 | The index of the first search result to return. Used for pagination. |
| maximumSummaryLength | no | n/a | The maximum number of characters allowed in the Summary field of any search result. The goal of this optional parameter is to allow the client to control the size of the payload before it is transmitted. |
| returnCustomField | no | n/a | The custom fields in the search index are not normally returned with search results. Requests including this parameter will have all search results attempt to locate a field in the search index matching the parameter value.Note: Multiple returnCustomField parameters can exist per request. |
| sortedByField | no | n/a | Sort search results by this search index field.Note: The field used for sorting cannot be Tokenized. You can control tokenization in the document specification. |
| isSortedAscending | no | false | When search results are being sorted by a field. This optional parameter controls the sort order. |
Search Results
The response returned by the Seeker web service is a collection of data encoded in JSON format. The search results themselves are wrapped in an envelope called Search Results Information which contains data about what was searched and what results are available.
An example search result:
{
  "SearchResults": [{
    "Score":0.5498657,
    "Domain":"solution",
    "Id":"2",
    "Title":"I can't connect to the VPN Server with my VPN Client",
    "Summary":"Users are unable to connect to WinRoute using the VPN client."
  }],
  "TotalNumberOfResults":2,
  "RequestedNumberOfResults":1,
  "StartResultIndex":0,
  "SearchQuery":"VPN",
  "Exception":null,
  "LastIndexUpdateTimestamp":
  "2008-10-02T11:16:23"
}
Search Results Information
The search service returns a wrapper around the search results containing information about what was searched and what details are available.
| Property | Description |
|---|---|
| Search Results | An array of search result JSON objects. |
| TotalNumberOfResults | The total number of search results that matched the search term. |
| RequestedNumberOfResults | The number of results requested. This will match the resultCount request parameter. |
| StartResultIndex | The index of the first search result returned. This will match the startResultIndex request parameter. |
| SearchQuery | The search query. This will match the query request parameter. |
| Exception | Only populated when something went wrong during the search process. |
| LastIndexUpdateTimestamp | When the search index was last updated. |
Search Results
Zero or more search results can be returned by a search ordered by diminishing relevance.
| Property | Example | Description |
|---|---|---|
| Score | .5498 | A rating of how relevant the result is to the search term(s). A value between 0 and 1. |
| Domain | solution | The type of search result being returned. |
| Id | 2 | Identifier of the search result. |
| Title | I can't connect to the VPN Server | Title of the search result. |
| Summary | Users are unable to connect to WinRoute using the VPN Client. | A summary of the search result. |
Search Query Syntax
Dovetail Seeker uses the excellent Lucene search engine library exposing your indexed data to simple or advanced queries. If you are familiar with the basic search engine query techniques you will feel right at home with querying Dovetail Seeker.
Simple Queries
The following is an example of a simple query:
Case 1234
Dovetail Seeker defaults to make search words exclusive. Only documents having the word Case and 1234 will be returned. This query is exactly the same as:
Case AND 1234
Changing this query to be inclusive, so that documents with Case or 1234 are returned, requires the use of the OR operator.
Case OR 1234
Note: The OR operator is case sensitive and needs to be capitalized.Advanced Queries
For a detailed account of the capabilities of the Seeker's query syntax please refer to the Lucene documentation on Query Parser Syntax.
Document Specifications API
Document Specifications are used to define which Dovetail/Clarify CRM data gets indexed by the indexing applications. This API exposes details about the document specifications used to create the Seeker search index.
Suggested Usages:
Allow search user interfaces to construct a dynamic search domain filter.
Search user interfaces can detect which custom fields present and available for sorting search results.
Stored custom field values can be retrieved and displayed along side search results.
Simple Example
Request:
GET /seeker/specifications/index
Response:
[{
  "Domain":"case",
  "FieldSpecifications":[{
    "Name":"part",
    "IsSortable":false,
    "IsStored":true
  },{
    "Name":"site",
    "IsSortable":false,
    "IsStored":true
  },{
    "Name":"site_objid",
    "IsSortable":false,
    "IsStored":true
  },{
    "Name":"contact",
    "IsSortable":false,
    "IsStored":true
  },{
    "Name":"contact_objid",
    "IsSortable":false,
    "IsStored":true
  },{
    "Name":"created",
    "IsSortable":false,
    "IsStored":true
  }]
}]
One domain specification is returned for each domain present in the search index. In the example above show a single domain present that has 6 custom fields. Note that this is the default case domain specification included with Dovetail Seeker.
File API
Dovetail Seeker has round trip support for both the uploading and download of files.
Download
File downloads APIs are used by Seeker to serve files which have been indexed by Seeker. Dovetail Seeker can also serve attachments related to indexed domains. Additionally there is a Generate Download URL API which Dovetail applications can use to setup the download of any desired file.
Upload Process
Dovetail applications can delegate the responsibility of uploading and storing files to Seeker. This removes the requirement for applications to have write access to corporate file shares.
Generate Download URL
This API should be used to prepare a file to be downloaded from Dovetail Seeker. This API takes a full file path to which Dovetail Seeker has read access and returns a public download URL to which the user's browser will be redirected.
Input
URL:
/seeker/file/url
HTTP Method(s):
- GET
Parameters
| Parameter | Required | Default | Description |
|---|---|---|---|
| Path | Yes | N/A | Full path of the file the application wishes to serve to the user. |
| ContentType | No | application/octet-stream | Mime type used to serve the file to the browser. |
| Expires | No | 7days | Date/Time that the generated token will expire |
| AlwaysUnique | No | False | Always generate a new token or not |
Response:
| Parameter | Description |
|---|---|
| Url | URL from which this file can be downloaded. |
| FileName | file name which will be served |
| Id | download file token id |
| Expires | Token Expiration date |
Examples
Request:
GET /seeker/file/url?Path=\\server\share\path\file.txt
Response:
{
  Url: "http://localhost/seekerproxy/resources/download?Token=download-token-id",
  FileName: "file.txt",
  Id: "download-file-token-id"
}
Upload Process
Dovetail Seeker uploading files is a two step process. First get permission to upload, then have the user directly upload the file to Dovetail Seeker.
The application will first call the private File Upload Token API to create an upload token which will be given to the application user along with the URL where they should upload the file. The upload token grants permission to someone on the Internet to upload a single file into Dovetail Seeker.
The user then directly uploads the file to Dovetail Seeker via the proxied Direct File Upload API.
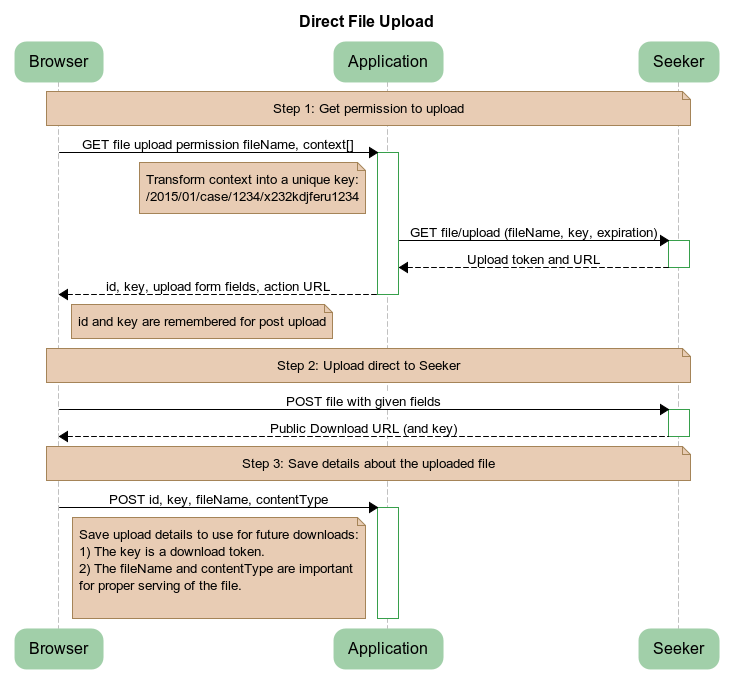
File Upload Token API
Applications need to call this API before users can upload files. Users will use the results of this API to do a Direct File Upload.
For more details about the upload process take a look at the File Upload Process sequence diagram.
Input
URL:
/seeker/file/upload/token
HTTP Method(s):
- GET
Parameters
| Parameter | Required | Default | Description |
|---|---|---|---|
| Key | Yes | N/A | Unique key identifying the uploaded file. The key should include a random path segment ensuring it is unique. This key will be used to create a directory path under which the uploaded file will be stored. Example: 2014/01/Case/1234/random-ksdfj213kdj87Note: It is beneficial to attempt to keep directory trees shallow to avoid file performance problems when many files are all put into one directory. |
| FileName | Yes | N/A | Name of the file to be uploaded. |
| Timeout | No | 5 minutes | How long should the upload token be valid. |
Response:
| Parameter | Description |
|---|---|
| ActionURL | URL to which the file should be posted |
| Token | Upload permission token which should be posted with the file upload. |
Examples
Request:
GET /seeker/file/token?Key=2015/01/case/1234/random-123456abcdedf&FileName=upload.log
Response:
{
  ActionURL: "http://localhost/seekerproxy/file/upload/",
  Token: "biglongrandomtokenstring"
}
Direct File Upload API
The Direct File Upload API is for application users to directly upload files into Dovetail Seeker. This API is proxied and is publicly available. Uploaded files can later be retrieved from the file download API using the file's Key.
Applications will typically setup the web browser to POST to this API using the results returned from the File Upload Token API. After the file is uploaded it is the responsibility of the application to remember the file upload components (key, file name, content type) for future retrieval of the uploaded file.
For more details take a look at the File Upload Process sequence diagram.
Input
URL:
/seeker/file/upload
HTTP Method(s):
- POST
Parameters
| Parameter | Required | Default | Description |
|---|---|---|---|
| UploadToken | Yes | N/A | The upload token returned by the file upload token API. When the token is invalid a 404 status will be returned. When the token has expired a 403 status will be returned. |
| Files | Yes | N/A | The form used to POST the file should have a file input with a name of "Files". Only one file can be uploaded at a time. If no files or more than one file were uploaded a 400 status will be returned. |
| AlwaysUnique | No | false | Always generate a new token or not |
| Expires | No | 1 day | Date/Time that the generated token will expire |
Response:
| Parameter | Description |
|---|---|
| DownloadURL | URL from which this file can be downloaded. |
| Key | Key identifying the file uploaded. This value is used to generate a download URL. |
Examples
Request:
POST /seeker/file/upload
Response:
{
  DownloadURL: "http://localhost/seekerproxy/file/download/random-download-token-id",
  Key: "2014/01/case/1234/2014/01/Case/1234/random-ksdfj213kdj87"
}
Resources API
The resources APIs allow for downloading of an actual file Resource given a token, and generating a download URL (using seekerproxy) with an expiring token for the specified resource based on its resource key.
Download Resource
Downloads the resource associated with the specified token.
Input
URL:
/resources/download
HTTP Method(s):
- GET
Parameters:
| Parameter | Required | Default | Description |
|---|---|---|---|
| Token | Yes | Resource Token | |
| ContentType | No | application/octet-stream | The content-type to download the file as. |
Response:
FileStream
Examples
Request:
GET /seeker/resources/download?Token=ee57dda8-5138-41bd-838a-7e91a506f42f
Response:
FileStream
Generate Download URL
Generates a new public download URL (using seekerproxy) with an expiring token for the specified resource based on its resource key (table_dt_resource.resource_key).
Input
URL:
/resources/{Id}/generate
HTTP Method(s):
- GET
Parameters
| Parameter | Required | Default | Description |
|---|---|---|---|
| Id | Yes | Resource Key | |
| Expires | No | 7days | How far in the future that the generated token will expire. Examples:
|
| AlwaysUnique | No | False | Always generate a new token or not |
Response:
| Parameter | Description |
|---|---|
| Expires | Date/Time token will expire |
| Url | seeker proxy url for downloading the file |
Examples
Request:
GET /seeker/resources/1705a634-525b-49e8-b69a-353f8f21db08/generate?Expires=100days
Response:
{
  "Expires":"2016-01-19T17:26:13.2642488Z",
  "Url":"http://localhost/seekerproxy/resources/download?Token=19952961-d175-48e2-97ca-f181c2cdf65b"
}
Spell Check API
Dovetail Seeker Web API includes a spell checking service. It accepts web requests that contains text to check for misspelled words and returns suggestions for each misspelled word in JSON data format.
The spell check service currently only supports the English language.Usages
The spell checking service is an HTTP endpoint that accepts either GET or POST requests with text parameter as the input and JSON as the output.
Input
URL:
/seeker/spell/check?text={text}
Format:
JSON
HTTP Method(s):
- GET
Parameters
| Parameter | Required | Default | Description |
|---|---|---|---|
| text | yes | n/a | The words to spell check |
Output
Content-Type: application/json
| Property | Description |
|---|---|
| Word | The misspelled word |
| Suggestions | A list of suggested words |
Response:
[{
  Word:"tst",
  Suggestions:["ts", "ts"]
}]
Examples
An example of doing an HTTP GET request with a single word.
Request:
GET /seeker/spell/check?text=tst
Response:
[{
  "Word":"tst",
  "Suggestions":["tat","ts","st","test","est"]
}]
Browsers impose limits on the maximum number of characters allowed in the address bar. If you are potentially checking large amounts of text, you can invoke the spell check with an HTTP POST.
An example of doing an HTTP POST request with a full sentence.
Request:
POST /seeker/spell/check
HTTP/1.1
Content-Length: 144
Content-type: application/x-www-form-urlencoded
text=That is, your spelling. To get an idea, take this simple test.
Is it affidavit or affidavid? accommodate or accomodate? conquer or conquor?
Response:
[{
  "Word":"affidavid",
  "Suggestions":[
    "affidavit","affianced","affiliated","affirmative","affiliation"
  ]
},{
  "Word":"accomodate",
  "Suggestions":[
    "accommodate","accommodating","accommodation","accomplice","accompanist"
  ]
},{
  "Word":"conquor",
  "Suggestions":[
    "conquer","conquest","conquistador","conjuror","conductor"
  ]
}]
Terms API
Dovetail Seeker Terms API searches the index for terms which start with the match text given.
Usages
This API can be used to provide autocomplete for search UI textboxes. Please take a look at the web client example which demonstrates search term auto completion.
Input
URL:
/seeker/terms/find?match={text}&limit={number}
Format:
JSON
HTTP Method(s):
- GET
Parameters
| Parameter | Required | Default | Description |
|---|---|---|---|
| match | Yes | N/A | The text to search for in the contents field of the index |
| limit | No | 10 | The number of results to return |
Response:
[
  "test",
  "testing",
  "tests",
  "tested",
  "testers",
  "testcase",
  "testbase",
  "testable",
  "tester",
  "testharness"
]
Examples
Request:
GET /seeker/terms/find?match=case&limit=10
Response:
[
  "case",
  "cases",
  "case.actentry",
  "case.case",
  "case.fields",
  "case.noteslog",
  "case.update",
  "case2address",
  "case2status_chg",
  "case_act2act_entry"
]
Term Suggest API
The Dovetail Seeker Term Suggest API will look for misspelled terms in the match text given and return search suggestions for correctly spelled terms which exist in the search index.
This API performs spell checking on the given text. It them searches the index for each suggested spelling correction to see which corrected spellings exist in the index and the frequency of their occurrence. Results are returned in descending frequency order.
The Frequency result is the number of documents in the index containing the search term.
Note: This is currently an expensive API. Please be sure
to do performance testing for your desired load.
Usage
This API allows your search clients to have behavior to many search engines where search terms can be suggested to the user when the search query contains misspelled words.
Input
URL:
/seeker/terms/suggest?match={text}&limit={number}
Format:
JSON
HTTP Method(s):
- GET
Parameters
| Parameter | Required | Default | Description |
|---|---|---|---|
| match | Yes | N/A | |
| limit | No | 10 | The number of results to return |
Response:
[{
  Term: "out",
  Frequency: 229
}{
  Term: "put",
  Frequency: 212
}{
  Term: "cut",
  Frequency: 190
}]
Examples
Request:
GET /seeker/terms/suggest?match=cse&limit=10
Response:
[{
  Term: "case",
  Frequency: 267
  }{
  Term: "cue",
  Frequency: 192
  }{
  Term: "chase",
  Frequency: 168
}]
Attachment Upload API
In Dovetail Seeker, uploading attachments is a two step process. First get a token to upload, then upload the file attachment to Dovetail Seeker. Dovetail Seeker will save the file to the file system, and create the attachment records (doc_inst and doc_path) in the database for the appropriate workflow entity.
The application will first call the Upload Token API to create an upload token which will be given to the application user.
The user then directly uploads the file to Dovetail Seeker via the Attachment Upload API.
Upload Token
This API provides a token that will be used for the actual upload of a file attachment.
Applications need to call this API before users can upload file attachments. Users will use the token returned from this API when uploading a file attachment.
Input
URL:
/seeker/attachment/upload/token
HTTP Method(s):
- GET
Parameters
| Parameter | Required | Default | Description |
|---|---|---|---|
| Key | Yes | N/A | The ID of the object that the attachment will be related to. For example: Case ID Subcase ID Solution ID |
| FileName | Yes | N/A | Name of the file to be uploaded. |
Response
| Parameter | Description |
|---|---|
| Token | Upload permission token which should be posted with the file upload. |
Examples
Request:
GET /seeker/attachment/upload/token?Key=4213&FileName=myfile.txt
Response:
{
  Token: "biglongrandomtokenstring"
}
Attachment Upload
The Attachment File Upload API is for application users to upload a file attachment. Dovetail Seeker will save the file to the file system, and create the attachment records (doc_inst and doc_path) in the database for the appropriate workflow entity.
Applications will typically setup the web browser to POST to this API using the results returned from the Attachment Upload Token API.
There are 2 application configuration settings that influence the behavior of this API.
| Setting | Description |
|---|---|
| seekerWebService.attachmentDirectoryPath | The base path where file attachments should be stored. |
| seekerWebService.attachmentMode | The AttachmentMode specifies which sub-folder mode should be used when saving file attachments. Valid values are ModeA, ModeB, or ModeC. For specific details, refer to the AttachmentMode Knowledgebase Article. |
<add key="seekerWebService.attachmentDirectoryPath" value="C:\attach" />
<add key="seekerWebService.attachmentMode" value="ModeB" />
Input
URL:
/seeker/attachment/upload
HTTP Method(s):
- POST
Parameters
| Parameter | Required | Default | Description |
|---|---|---|---|
| UploadToken | Yes | N/A | The upload token returned by the file upload token API. When the token is invalid a 404 status will be returned. When the token has expired a 403 status will be returned. |
| Files | Yes | N/A | The form used to POST the file should have a file input with a name of "Files". Only one file can be uploaded at a time. If no files or more than one file were uploaded a 400 status will be returned. |
| ObjectType | Yes | N/A | The type of object that this attachment is for. e.g. case, subcase, solution, etc. |
| Username | No | N/A | The username of the employee who the act_entry for uploading a file should be recorded as. If not specified, it will be Seeker's application user. |
Response:
| Parameter | Description |
|---|---|
| path | Full path and filename of where the file was saved to |
| Id | Objid of the doc_inst record that was created |
| workflowObject.Id | ID number of the object that the attachment is for |
| WorkflowObject.Type | Type of the object that the attachment is for |
| Name | Saved filename. This may be different than the name of the file uploaded to prevent duplicates. For example, if file.log is uploaded twice, the first time the saved filename will be file.log. The second time it will be file-1.log |
Examples
Request:
POST /seeker/attachment/upload
Response:
{
  "Path": "C:\\attach\\004xxx\\004213\\file-1.log",
  "Id": 268436690,
  "WorkflowObject": {
    "Id": "12345",
    "Type": "Case"
  },
  "Name": "file-1.log"
}
Creating and Updating Indexes
Dovetail Seeker comes with a console and a Windows service that can both create and update search indexes. These indexing applications are the Seeker Windows Service and the Seeker Console application.
Seeker Windows Service
Dovetail Seeker includes a Windows service called Seeker Indexer Service which makes it easy to keep your search index up-to-date. Seeker Indexer Service polls the Dovetail CRM database for new or updated entities and updates the index. Additionally the service will poll directories for your file specifications. The Seeker Indexer Service behavior is equivalent to running the Seeker Console indexer on a recurring basis but with less performance impact to your application server.
Before starting the Seeker Indexer Service you will need to edit the application settings file. However, you may want to test that your application settings are configured correctly by first using the Seeker Console to create your index.
Note: You can control how long the Seeker Indexer Service waits
between index updates in the application settings file.
To start the Dovetail Seeker Service
- Open the Services Control Manager. Control Panel -> Administrative Tools -> Services
- Select the Dovetail Seeker Indexer Service
- Click on Start link, click the Start button or Right Click -> Start
To Install Additional Dovetail Seeker Windows Services Instances on the Same Server
- Make a copy of the seeker install directory.
- Open a command prompt
- Navigate to the indexer directory in the seeker install directory
- At a command line run
SeekerService.exe install /instance: <new instance name> - You should see output that looks like this containing your windows service
instance name which will make this service unique.
>SeekerService.exe service install /instance:NumeroDos
2009-09-24 14:02:43,948 INFO  Topshelf.Runner - Starting Host
2009-09-24 14:02:44,026 INFO  Topshelf.Internal.Actions.InstallServiceAction - Received service install notification
Running a transacted installation.
Beginning the Install phase of the installation.
2009-09-24 14:02:44,044 INFO  Topshelf.Internal.Hosts.HostServiceInstaller - Installing Service DovetailSeekerNumeroDos
Installing service DovetailSeekerNumeroDos...
Service DovetailSeekerNumeroDos has been successfully installed.
Creating EventLog source DovetailSeekerNumeroDos in log Application...
The Install phase completed successfully, and the Commit phase is beginning.
The Commit phase completed successfully.
The transacted install has completed.
To Uninstall Additional Dovetail Seeker Windows Services
- At a command prompt change directories to the location of your alternate Dovetail Seeker application directory.
- Run
SeekerService.exe uninstall /instance:<instance name>
Add a new web application for each additional Dovetail Seeker Windows Service
Create a Application Pool
- Open IIS Manager: select Start - type IIS, and select Internet Information Services (IIS) Manager
- Click on your computer host name to expand the top-level node.
- Click on Application Pools
- Right-click on Application Pools and choose Add Application Pool
- Enter a name, such as
Seeker-{instance} - Set the .NET Framework Version to version 4.
- Set the Managed Pipeline Mode to Integrated.
Create the web application
- Right-click Default Web Site and select Add Application
- In the Alias text box, type
Seeker-{instance} - Enter the path to
$newSeekerInstance\webservice - Select the
Seeker-{instance}Application Pool that you created earlier - Select OK.
Update the Web.config file for the web application
- Navigate to the webservice directory in the seeker install directory.
- Edit the Web.config file.
- Update the
<add key="serviceInstanceName" value=""/>entry, setting its value to"{instance}".
Live Document Specification Change Detection
The Dovetail Seeker Indexer Windows Service monitors the documentSpecifications.xml file in the configuration directory for changes. The Windows Service is smart enough to detect the addition, removal, and modification of document specifications for both Dovetail and file document specifications.
Specification changes cause the affected search domain to be re-indexed When there is a change in an existing document specification, the Windows Service will perform a re-index of that specification to make sure all changes to the specification are reflected by the search index.
Why?
Re-indexing the search index on changes is important in-order to keep the search index fields consistent. If this did not happen search documents already indexed would be in the old format with new documents added to the index reflecting the current configuration.
Removing Specifications
When dovetail or file document specifications elements are removed from the documentSpecification.xml file the search documents for that domain will be removed from the search index.
Adding Specifications
When specifications are added to the documentSpecification.xml file they will be begin indexing during the next Dovetail or File polling interval.
How Indexing Work Is Produced And Consumed
The primary goal of the Dovetail Seeker Indexer Windows Service is to keep the search index up-to-date. This is accomplished by splitting the job between work producers (what needs to be done) and consumers (content indexers) using a Microsoft Message Queue to communicated between them.
Producers - What's New or Updated?
The indexer has work producers which monitor the database and file system for changes. When a producer detects that an object in the database or file system has changed it publishes a message to a queue which contains instructions on what items need to be added or updated in the index. The job of the producer is then done. The producers use timers to wake up at configurable intervals to produce index update messages.
Database Producer Example
The database monitor detects that 3 cases have been modified. It will then push a message onto the work queue which basically says: Please update the search index with the details from the Dovetail database's case 42, 43, and 44.
Consumers - Update the index
When a message is published to the queue a message consumer will wake up and start processing the message. Doing whatever needs to be done be it updating the index for a case or indexing a new word document that just showed up in a watched directory. One big advantage of this approach is that many consumers can be created to chew through the work queue. In fact, when there is a lot of work to do the number of consumers is equal to the total of 2 times the number of processors on the host server. This allows Dovetail Seeker to process a lot of search content simultaneously.
One Down Side
When there is a lot of work queued up Dovetail Seeker may appear to not be doing what you've told it to do. For example if you tell Dovetail Seeker to re-index all of your case documents and the queue is already full of other work it is doing you make think your request didn't work when it was really just added to the end of the work queue.
Seeker Console
The Seeker Console is a command line utility for performing administrative tasks to your Dovetail Seeker search index. Before you run the Seeker Console for the first time you will need to edit the application settings file.
Run the Seeker Console to create, update, re-index, search, and optimize indexes.
- Open a command prompt and navigate to the Dovetail Seeker installation directory. The default directory is 'C:\Program Files\Dovetail Software\Seeker\'
- Go to the directory named indexer.
Type SeekerConsole.exe to see application usage instructions.
Index Command
Create or Update Your Search Index
The index command will update your search index with new content or content which has been updated since the index was last updated. It can optionally index a certain specification by passing in the displayName. When no search index directory is present the index command will create one.
The syntax for the command is:
seekerconsole.exe --index [specification display name]
The following examples show how to index all the specifications and an explicit specification.
Indexing all domains
Running the index command with no arguments will update the index for all document specifications.
The following is sample output from creating an index.
>seekerconsole.exe --index

Dovetail Seeker Console - version 2.0.5.9319
INFO  11:22:34 Dovetail.Search.Console.ConsoleController - Executing index command (Update the Dovetail Seeker search index.).
INFO  11:22:34 Dovetail.Search.Indexing.IndexWriterBoundary - Index opened.
INFO  11:22:34 Dovetail.Search.Commands.UpdateIndexCommand - Updating index for all domains.
INFO  11:22:34 Dovetail.Search.Indexing.ClarifyDocumentService - Domain solution was last indexed at 01/01/1753 00:00:00
INFO  11:22:34 Dovetail.Search.Indexing.ClarifyDocumentService - Found 20 solution documents requiring indexing.
INFO  11:22:34 Dovetail.Search.Indexing.IndexWriterBoundary - Closing index.
Indexing a domain (display name)
When the first argument to the index command is the display name (domain) of a document specification, only that domain will be updated.
This example will only update the case document specification:
>seekerconsole.exe --index case

Dovetail Seeker Console - version 2.0.5.9319
INFO  11:19:25 Dovetail.Search.Console.ConsoleController - Executing index command (Update the Dovetail Seeker search index.).
INFO  11:19:25 Dovetail.Search.Indexing.IndexWriterBoundary - Index opened.
INFO  11:19:25 Dovetail.Search.Commands.UpdateIndexCommand - Updating index for domain case.
INFO  11:19:25 Dovetail.Search.Indexing.ClarifyDocumentService - Domain case was last indexed at 01/01/1753 00:00:00
INFO  11:19:25 Dovetail.Search.Indexing.ClarifyDocumentService - Found 431 case documents requiring indexing.
INFO  11:19:31 Dovetail.Search.Indexing.UpdateClarifyDocumentConsumer - Updated 100 dovetail case documents.
INFO  11:19:32 Dovetail.Search.Indexing.UpdateClarifyDocumentConsumer - Updated 100 dovetail case documents.
INFO  11:19:33 Dovetail.Search.Indexing.UpdateClarifyDocumentConsumer - Updated 31 dovetail case documents.
INFO  11:19:34 Dovetail.Search.Indexing.IndexWriterBoundary - Closing index.
Important Notes:
We recommend that you use the Dovetail Seeker Indexer windows service to keep the search index updated. Please only use this command as a secondary and diagnostic way to keep the index up-to-date.
Be careful when using console commands, like index, which modify the search index while the Dovetail Seeker Indexer Windows service is running. There is a good chance that you will run into index locking issues.
Re-Indexing Command
Regenerate All or Part Of Your Index
This command will erase existing content in your index and regenerate the index for all or optionally one document specification.
The syntax for the command is:
SeekerConsole --reindex [specification display name]
When the database contains data that is out of sync with your search index you should use the Seeker Console to re-index your database. Re-indexing will remove all search documents from the index and rebuild the index.
Running the reindex command with no arguments will update the index for all document specifications. When the first argument to the reindex command is the display name (domain) of a document specification, only that domain will be reindexed.
Warning: This operation could take a long time depending on the number of entities being indexed.
>seekerconsole.exe --reindex

Dovetail Seeker Console - version 2.0.5.9319
INFO  11:24:45 Dovetail.Search.Console.ConsoleController - Executing reindex command (argument: domain to reindex. When no
argument is specified all domains will be reindexed.
                Warning: this operation may take a very long time.).
INFO  11:24:45 Dovetail.Search.Indexing.IndexWriterBoundary - Index opened.
INFO  11:24:45 Dovetail.Search.Commands.ReIndexCommand - Reindexing all domains.
INFO  11:24:45 Dovetail.Search.FileDocuments.DeleteDomainConsumer - Deleting attachment,case,contact,documentation,solution domain documents.
INFO  11:24:45 Dovetail.Search.Commands.UpdateIndexCommand - Updating index for all domains.
INFO  11:24:45 Dovetail.Search.Indexing.ClarifyDocumentService - Domain solution was last indexed at 01/01/1753 00:00:00
INFO  11:24:45 Dovetail.Search.Indexing.ClarifyDocumentService - Found 20 solution documents requiring indexing.
INFO  11:24:46 Dovetail.Search.Indexing.IndexWriterBoundary - Closing index.
Re-Indexing a domain (display name)
When you want to only re-index a specific domain, add the domain name as an argument to the command line.
>seekerconsole.exe --reindex solution

Dovetail Seeker Console - version 2.0.5.9319
INFO  11:27:41 Dovetail.Search.Console.ConsoleController - Executing reindex command (argument: domain to reindex. When no
argument is specified all domains will be reindexed.
                Warning: this operation may take a very long time.).
INFO  11:27:42 Dovetail.Search.Indexing.IndexWriterBoundary - Index opened.
INFO  11:27:42 Dovetail.Search.Commands.ReIndexCommand - Reindexing the solution domain.
INFO  11:27:42 Dovetail.Search.FileDocuments.DeleteDomainConsumer - Deleting solution domain documents.
INFO  11:27:42 Dovetail.Search.Commands.UpdateIndexCommand - Updating index for domain solution.
INFO  11:27:42 Dovetail.Search.Indexing.ClarifyDocumentService - Domain solution was last indexed at 01/01/1753 00:00:00
INFO  11:27:42 Dovetail.Search.Indexing.ClarifyDocumentService - Found 20 solution documents requiring indexing.
INFO  11:27:42 Dovetail.Search.Indexing.IndexWriterBoundary - Closing index.
Important Note
Be careful when using console commands, like reindex, which modify the search index while the Dovetail Seeker Indexer windows service is running. There is a good chance that you will run into index locking issues. We recommend that you stop the windows service while using the SeekerConsole to manipulate the index.
Search Command
Test Your Search Index Contents
This command will allow you to test your index:
SeekerConsole.exe --search <query>
Running searches against an index can be useful for testing an index after modifications are made to the document specification. For example, if the severity of the Case is added as a custom field in the document specification, it can be tested using the following syntax "--search severity:high".
The following is an example of using Seeker Console to search the index.
>seekerconsole.exe --search Case

Dovetail Seeker Console - version 2.0.5.9319
INFO  11:02:58 Dovetail.Search.Console.ConsoleController - Executing search command (Search the Seeker index. Requires additional search query argument.).
INFO  11:02:59 Dovetail.Search.Indexing.IndexWriterBoundary - Index opened.
INFO  11:02:59 Dovetail.Search.SearchService - Searching for 'case' returned 81 hits
---
case case to find
*** PHONE LOG 7/28/2010 1:22:00 PM sa Action Type: Incoming call
this is a sample case
---
Optimize Command
Improve Search Performance
Over time, your search index will get fragmented as documents are added and updated affecting search performance. Running this command will condense the search index into a single file segment allowing for faster searching as only one file needs to be scanned by the search engine. If you wish to manually optimize the index you can run the optimize command.
The syntax for the command is:
SeekerConsole.exe --optimize
After the optimization is complete there should be a reduced number of files in your search index directory.
Here is an example of the output generated by the command:
Warning: This operation could take a long time depending on the number of entities being indexed.
2009-10-26 INFO Dovetail.Search.Console.ConsoleController - Executing optimize command (After large amounts of content have been modified in an index it is a good idea to optimize. This operation may take a long time).Important Note
The Dovetail Seeker Indexer Windows Service will automatically do this for you at regular intervals. This tool has been left in place as a utility and for users who cannot use the windows service.
Running Seeker Console as a Scheduled Task
In an active Dovetail CRM system, entities are constantly added and updated. Certain business or technical requirements may dictate that the Seeker Service cannot be used to maintain an index. As an alternative, the Seeker Console can be used within a Windows Scheduled Task.
To schedule a new task:
- Open Task Scheduler.
- Double-click Add Scheduled Task.
- Follow the instructions in the Scheduled Task Wizard.
It is also possible to manage scheduled tasks from the command line using Schtasks.exe.
Developer Resources
Dovetail Seeker installs an example for developers to reference in building their own search clients.
- .NET Client Example
The default location of developer resources is [Install Dir]\developer.
.NET Client Example
Dovetail Seeker includes a .NET assembly, The Dovetail.Search.Client, in the developer directory. This is an example implementation of a Dovetail Seeker Client written in C#. We have included the source code used to generate the assembly. You are welcome to use this source as guidance for creating your own Dovetail Seeker Client.
The default location is [Install Path]\developer\dotnet-client\.
The following features are included: