
Installing RuleManager
Using the MSI Installation Package
Begin the installation by extracting the contents of the RuleManager ZIP file into a temporary folder. Run the MSI installation process by double-clicking on the RuleManager.msi file.
The installation will then proceed through a series of steps or screens which will either provide information about the installation process, or request information necessary to install RuleManager.
Update the Clarify Schema
You can update the Clarify schema with Dovetail SchemaEditor.
Prior to making schema changes, backup the current database.
To make these changes using Dovetail SchemaEditor:
- Edit the .SchemaEditor file
- Set the database connection information.
- Set the inputFilePath to [InstallDir]\config\schema\rulemanager.schemascript.xml
- Preview the changes (SchemaEditor.exe -p).
- Apply the changes (SchemaEditor.exe -a).
License Installation
You should have received a license for RuleManager either with your distribution or separately. If you have not received a license for RuleManager, please contact us to obtain one.
To install your RuleManager license
Execute the Dovetail Software License Installer which is found in the Dovetail SDK installation root.
The database connection/login screen will appear (Figure 2). This allows License Installer to connect to your Clarify™ database instance and view current and install new Dovetail Software licenses. Please enter required information (all fields are required except for "DB Name" when the database type is "Oracle") and click "Login". The License Installer will then attempt to connect to the database.
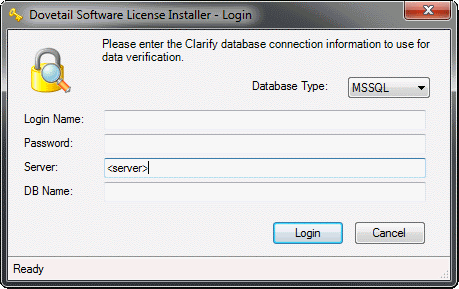
Figure 2: License Installer Login ScreenAfter successfully connecting to the database and retrieving any existing license information, the license information screen (Figure 3) will be displayed. This will list any existing licenses and some basic information about them. It also allows you to install new licenses by clicking on the "Install New License(s)" button.
Figure 3: License Installer License Information ScreenTo install a new license or licenses, click the "Install New License(s)" button. You will be prompted (see Figure 4) to select an XML license file, or paste a license XML fragment you may have received in an email or other source. Once you have loaded or pasted the XML fragment, click the "Install" button to install the license.
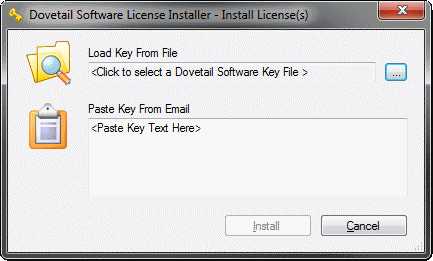
Figure 4: License Installer Load License ScreenIf the installation is successful, the license information screen will appear. The newly installed license(s) should appear in the list of installed license. At this point the License Installer can be closed, or new licenses can be installed as many times as is needed. If the installation is not successful, an error dialog window will appear giving further details about what went wrong.
Security Considerations
For Windows 2000, Windows XP, and Windows 2003, there are special security considerations to think about before starting the RuleManager service.
The RuleManager installer defaults the RuleManager service to run under the predefined local account named "LocalSystem". This account has extensive privileges on the local computer. Most services do not need such a high privilege level and due to the risk posed, it is advised not to run other services as this account. It is recommended that you change the account that the RuleManager service runs as.
This account should have the following privileges:
- Read and execute access to the RuleManager install directory (typically C:\Program Files\Dovetail Software\RuleManager)
- If logging, read/write write permissions to the folder where the log files will be created.
- Any other permissions to folders or files used by the software (such as Read/Execute access to the .NET Framework Runtime DLLs, or, for Oracle, the Oracle client bin folder)
- Standard permissions to run as a service and access the .NET Framework - the list of these permissions is beyond the scope of this document. Please consult the Microsoft knowledge base for specific information.
[Optional] Setup SMS Notifications
If you plan to use SMS Notifications, follow the instructions for configuring SMS Notifications
[Optional] Setup Slack Notifications
If you plan to use Slack Notifications, follow the instructions for configuring Slack Notifications
Starting the Service
By default, after the service is installed, it is not started. In order for RuleManager to begin processing, the service must be started.
- Open Control Panel, Administrative Tools, and open the 'Services' applet.
- Find the RuleManager service in the list (or whatever name you gave your service during installation).
- Click the "Play" or "Start" button in the toolbar. RuleManager should start after a few seconds.
Note: If RuleManager fails to start, you will be prompted with a generic
error message from Windows. Consult the Windows Event Viewer to get more
information about why RuleManager failed to start. To run the Event
Viewer, open the "Event Viewer" applet in the same folder where the "Services"
applet was.